
Cristi Miloiu
May 07, 2024
Share on:
30 minutes read
Welcome, automation enthusiasts! My name is Cristi, and in this tutorial, I’ll guide you through the process of creating a WhatsApp bot and implementing a simple ‘ping pong’ interaction. This is a crucial step towards leveraging automation, covering the essentials to get you started on your journey to building more complex bots like natural language processing chatbots, e-commerce assistants, customer service bots, and more.
Genezio comes in handy as a tool to create, manage and quickly deploy a customized API that can communicate with the WhatsApp API Cloud without the need for the user to manage servers on their own. Through Genezio, you can define how your bot interacts with users on WhatsApp. This will enable you to automate responses and execute various actions based on received messages or predefined events. It’s an essential component in building and managing the functionality of your WhatsApp bot, facilitating seamless communication between your application and the WhatsApp messaging platform.
Overview:
- In this tutorial, you’ll:
- Create an API to manage requests
- Create the app in Meta Admin
- Configure the project
Now let’s start!
Create an api that manages all requests
The first time, open your favorite IDE and a terminal.
- In your terminal install genezio using npm:
npm install genezio -g
- Then, use this command to log in:
genezio login
- Now create the project by running this command
genezio create backend --backend=onboarding-ts --name=genezio-whatsapp-bot --region=us-east-1
This command will initialize your genezio project so you can start.
- Change into the newly created
genezio-whatsapp-botfolder:
cd genezio-whatsapp-bot
- Create a .env file and paste the credentials. The file should be like this:
GRAPH_API_TOKEN=<temporary access token>
BUSINESS_PHONE_NUMBER_ID=<Phone number ID>
WEBHOOK_VERIFY_TOKEN=<random string>
I will show you later where you can get the values for credentials.
- In your terminal run:
npm install axios
Create a file called webhook.ts in the genezio-whatsapp-bot directory.
Add the following structure:
import {
  GenezioDeploy,
  GenezioHttpRequest,
  GenezioHttpResponse,
  GenezioMethod
} from "@genezio/types";
import axios from "axios";
@GenezioDeploy()
export class BackendService {
  GRAPH_API_TOKEN = process.env.GRAPH_API_TOKEN;
  WEBHOOK_VERIFY_TOKEN = process.env.WEBHOOK_VERIFY_TOKEN;
  BUSINESS_PHONE_NUMBER_ID = process.env.BUSINESS_PHONE_NUMBER_ID;

  constructor() {
    if (
      !this.GRAPH_API_TOKEN ||
      !this.WEBHOOK_VERIFY_TOKEN ||
      !this.BUSINESS_PHONE_NUMBER_ID
    ) {
      throw new Error("Missing environment variables");
    }
  }
  async #sendMessage(message: string, phone: string): Promise<boolean> {}
  @GenezioMethod({ type: "http" })
  async webhook(request: GenezioHttpRequest): Promise<GenezioHttpResponse> {}
}
This structure defines the following components:
@GenezioDeploy()decorator is used to know which class is deployed on the server provided by Genezio for the production environment. This way your code can be accessed at any time without having a local server running.@GenezioMethod({type:"http"})decorator is used to turn a method of a class into an endpoint you will later use to receive http requests.export class BackendServiceis the definition of the class that we will use in this tutorial.GRAPH_API_TOKEN ,WEBHOOK_VERIFY_TOKEN, BUSINESS_PHONE_NUMBER_IDare the credentials we need.sendMessageis the method by which we will be able to send a message.webhookis the method which will serve as an endpoint to receive all application requests.
- Implement the webhook method.
@GenezioMethod({type: "http"})
  async webhook(request: GenezioHttpRequest): Promise<GenezioHttpResponse> {
    try {
      if (request.queryStringParameters !== undefined) {
        // Webhook verification by WhatsApp Business API
        const mode = request.queryStringParameters["hub.mode"];
        const token = request.queryStringParameters["hub.verify_token"];
        const challenge = request.queryStringParameters["hub.challenge"];
        if (mode === "subscribe" && token === this.WEBHOOK_VERIFY_TOKEN) {
          console.log("Webhook verified successfully!");
          return {
            headers: {"Content-Type": "application/json"},
            statusCode: "200",
            body: challenge
          }
        } else return {
          headers: {"Content-Type": "application/json"},
          statusCode: "403",
          body: "Forbidden"
        }
      }

      const body = request.body.entry[0].changes[0].value.messages[0].text.body; // Message received

      if (body === "ping") { // Wait for the ping message
        console.log("Ping received")
        await this.#sendMessage("pong", request.body.entry[0].changes[0].value.messages[0].from)
        return {
          headers: {"Content-Type": "application/json"},
          statusCode: "200",
          body: "Message sent"
        }
      }

      return {
        headers: {"Content-Type": "application/json"},
        statusCode: "200",
        body: "Message not handled"
      }

    } catch (error) {
      console.error(error)
      return {
        headers: {"Content-Type": "application/json"},
        statusCode: "500",
        body: "Internal server error"
      }
    }
  }
This method serves as the main logic for handling incoming api requests from WhatsApp Business API, verifying the webhook, processing messages, and responding accordingly.
The method uses GenezioHttpRequest and GenezioHttpResponse types to answer and receive the message more easily. If you want to read more about this, I recommend you to look at the
documentation
.
- Implement the sendMessage method
async #sendMessage(message: string, phone: string): Promise<boolean> {
    try {
      console.log("Sending message to", phone)
      await axios({
        method: "POST",
        url: `https://graph.facebook.com/v19.0/${this.BUSINESS_PHONE_NUMBER_ID}/messages`,
        headers: {
          Authorization: `Bearer ${this.GRAPH_API_TOKEN}`,
        },
        data: {
          messaging_product: "whatsapp",
          recipient_type: "individual",
          to: phone,
          type: "text",
          text: {
            preview_url: false,
            body: message
          }
        }
      })
      return true
    } catch (error) {
      console.error(error)
      return false
    }
  }
This method abstracts the messaging logic through the Facebook Graph API for the WhatsApp Business API, providing a simple and modular way to send messages to specific recipients.
- Now you need to take the credentials and use them in the .env file.
Create the app on the WhatsApp API Cloud
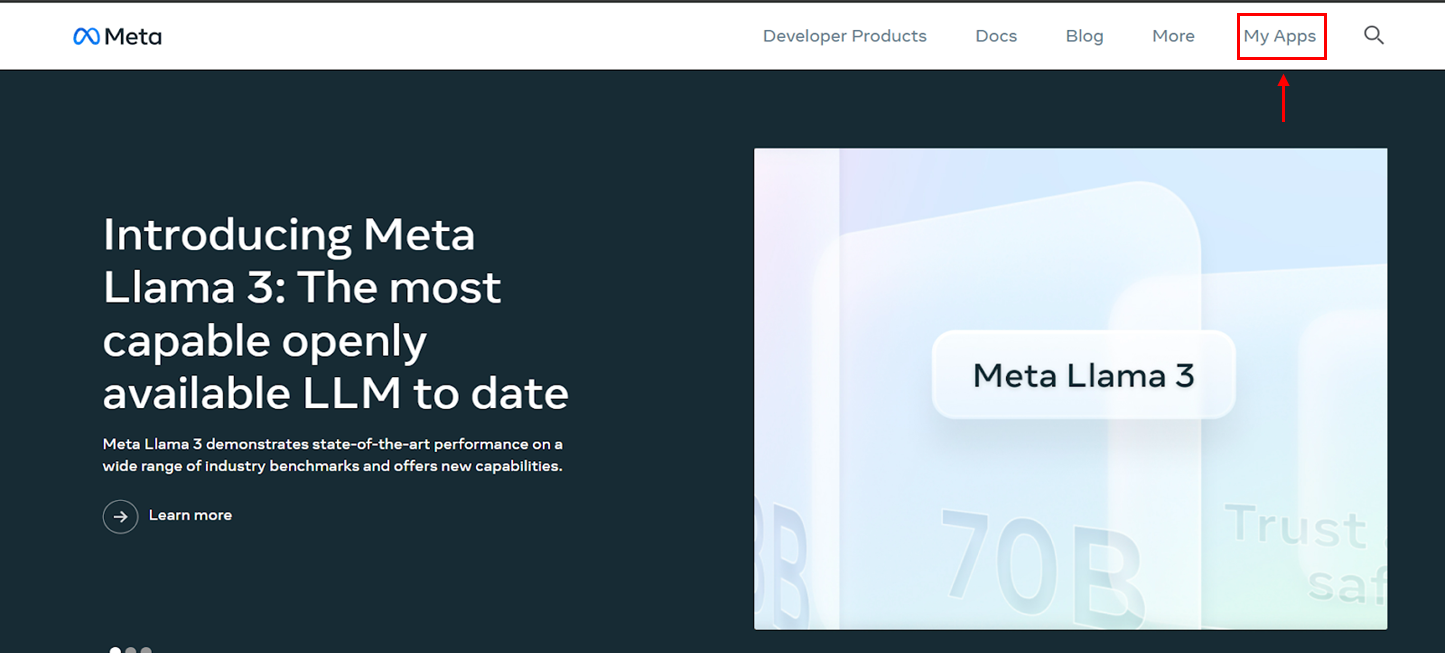
- Go to the Meta Website and create an account.

- Select “My Apps”
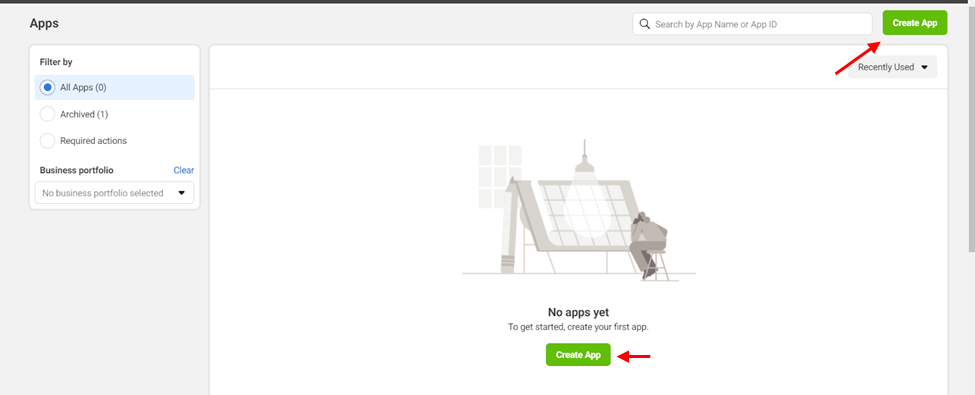
- Select “Create App”
- Select “Other” and click on ‘Next’
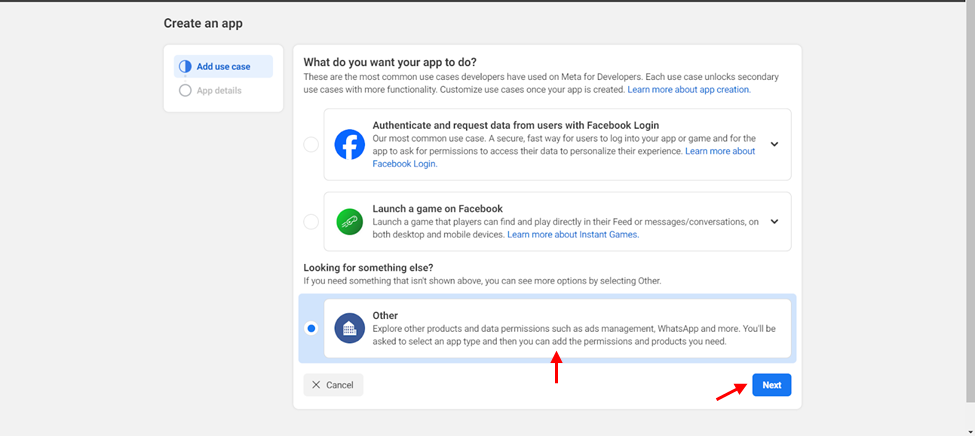
- Select “Business” and click on ‘Next’
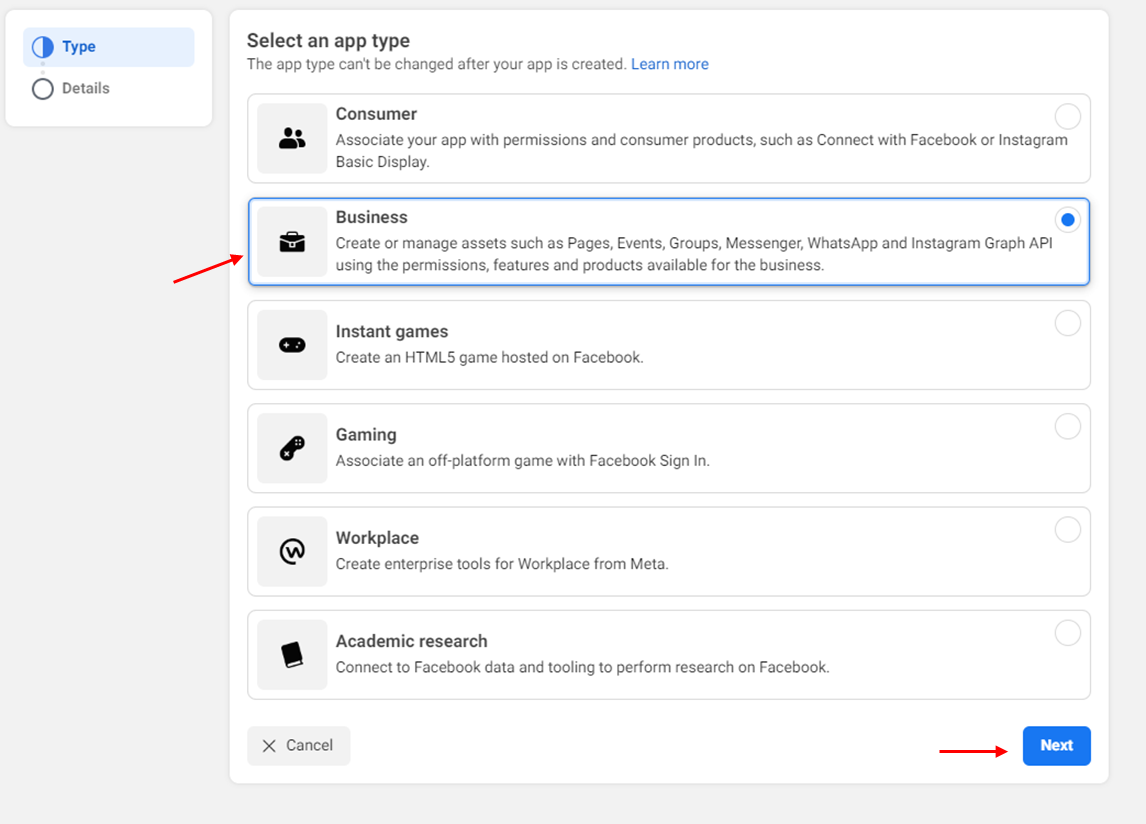
- Add an app name and the contact email address and click on ‘Create app’.

Configure the project
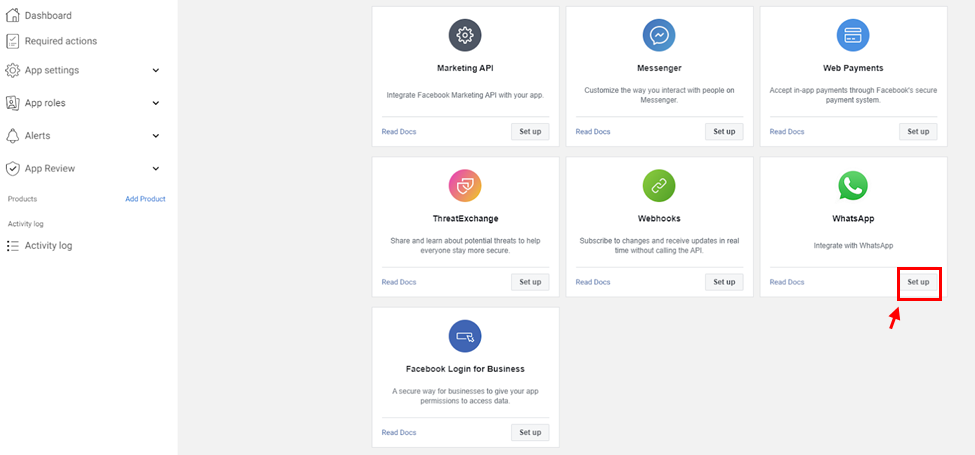
- Search for the Whatsapp Integration and click on ‘Set up’.
- Select a business portfolio
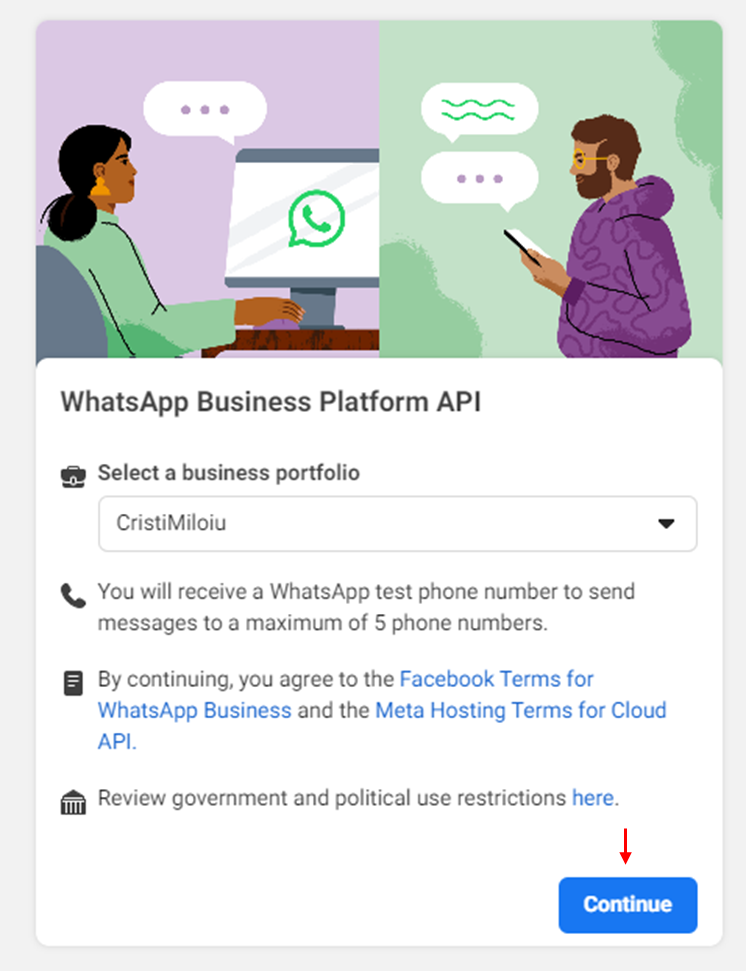
- Start using the API

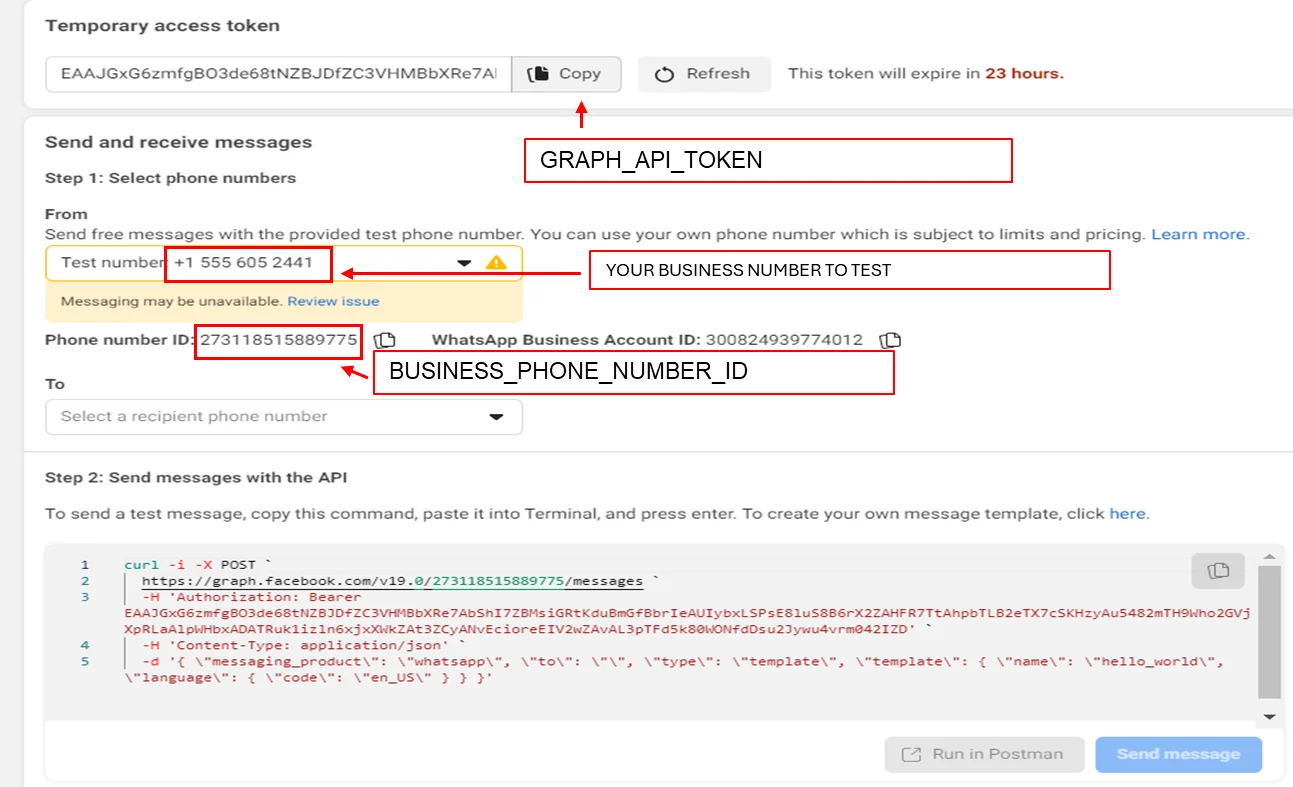
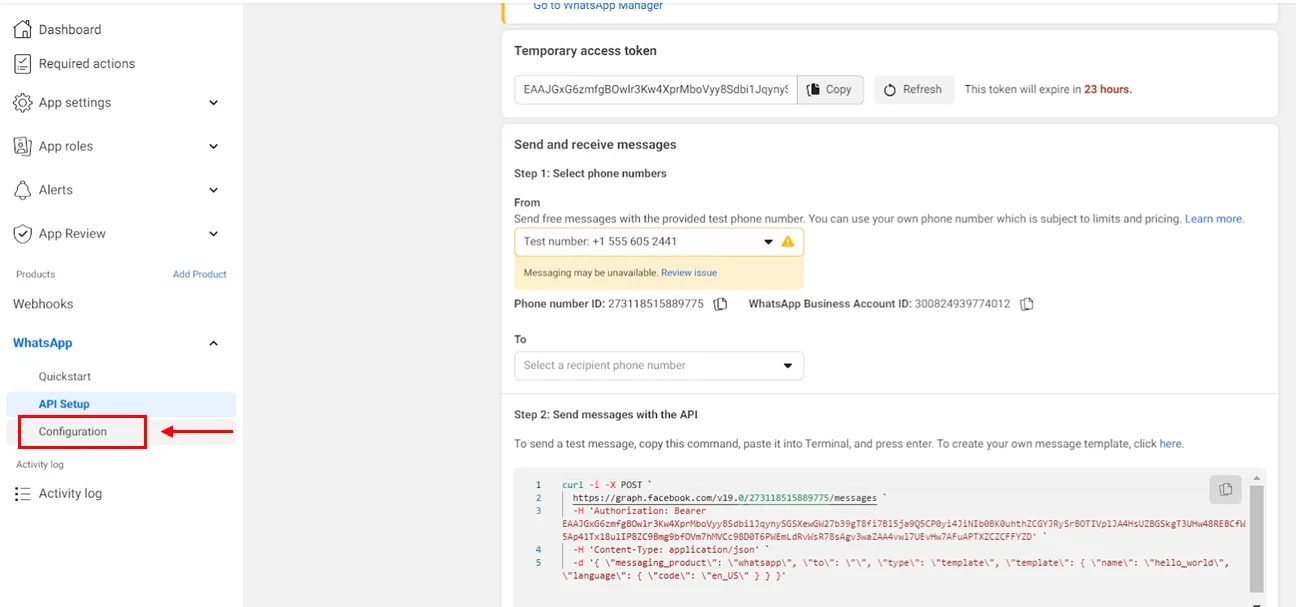
- From here we will take the access token and Phone number ID.
GRAPH_API_TOKEN=<temporary access token>
BUSINESS_PHONE_NUMBER_ID=<Phone number ID>
Note: Here you can also see which phone number you can test the bot on.
- In order for the bot to work, we still need to configure an api for callback. Select Configuration
- Click on ‘Edit’
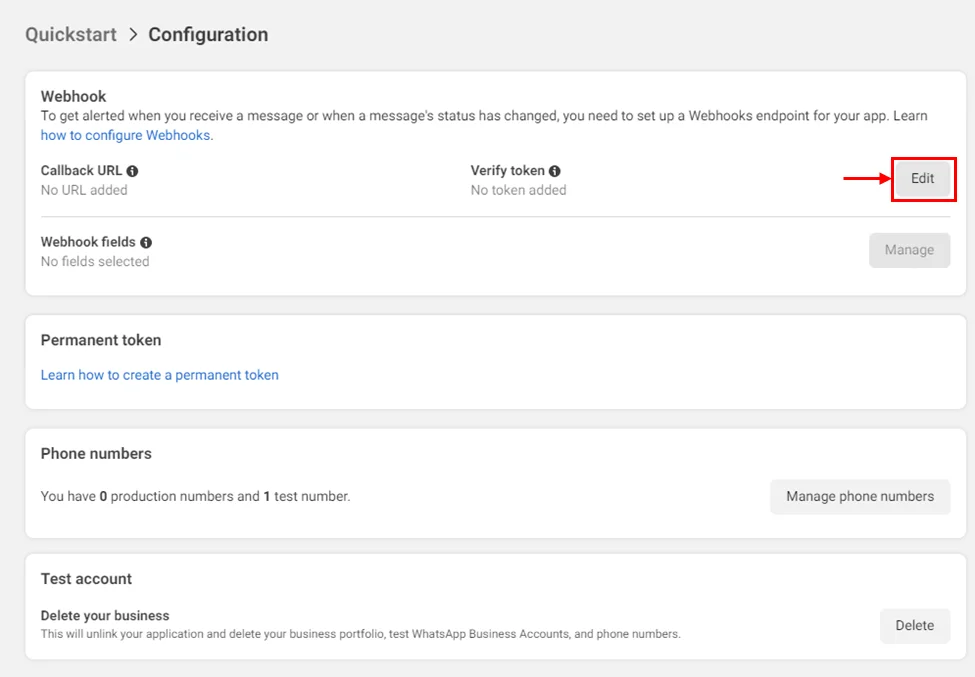
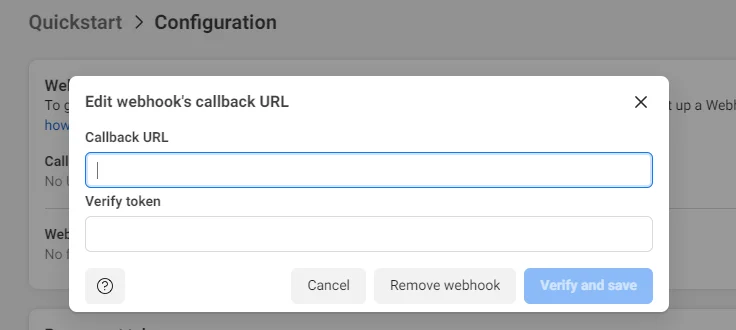
Here we need a callback url and a verify token. The Callback url will be generated in the next step and verify token is a random string put by you which is the same as the one in the .env file to the key WEBHOOK_VERIFY_TOKEN
- Deploy your project.
Go back in your project to the root folder of your project and run the following command:
genezio deploy -env .env
Take the url from : BackendService.webhook
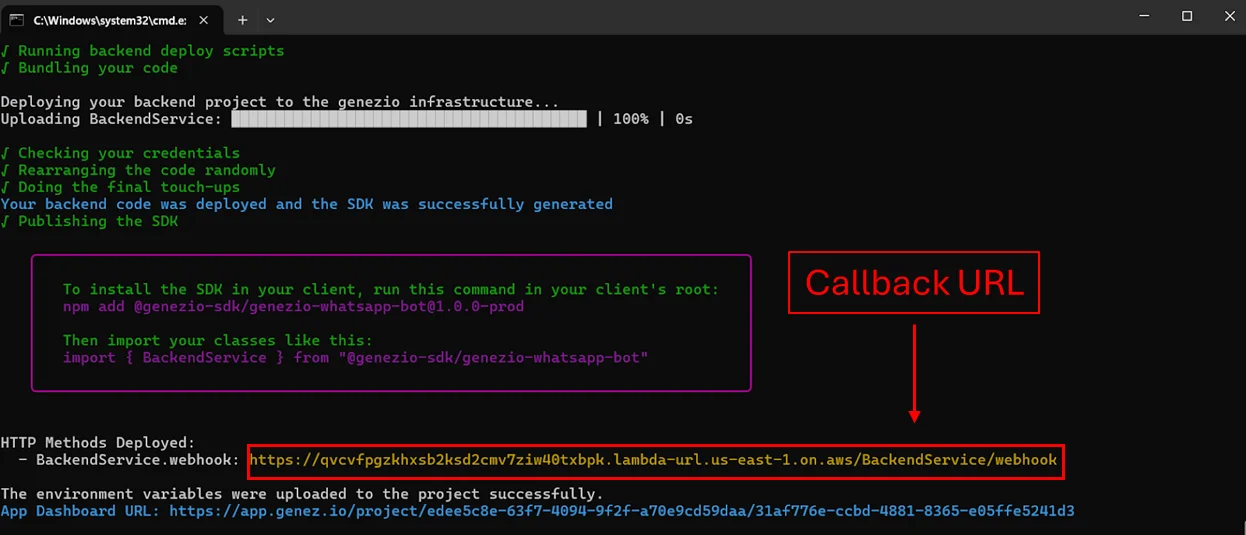
- Put the link to the callback from the platform
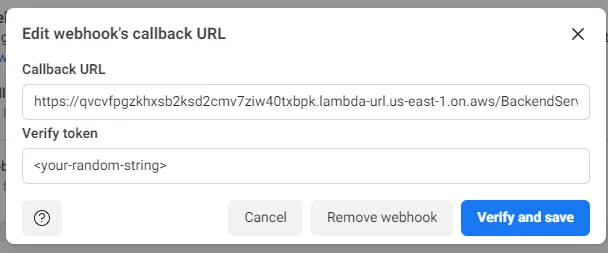
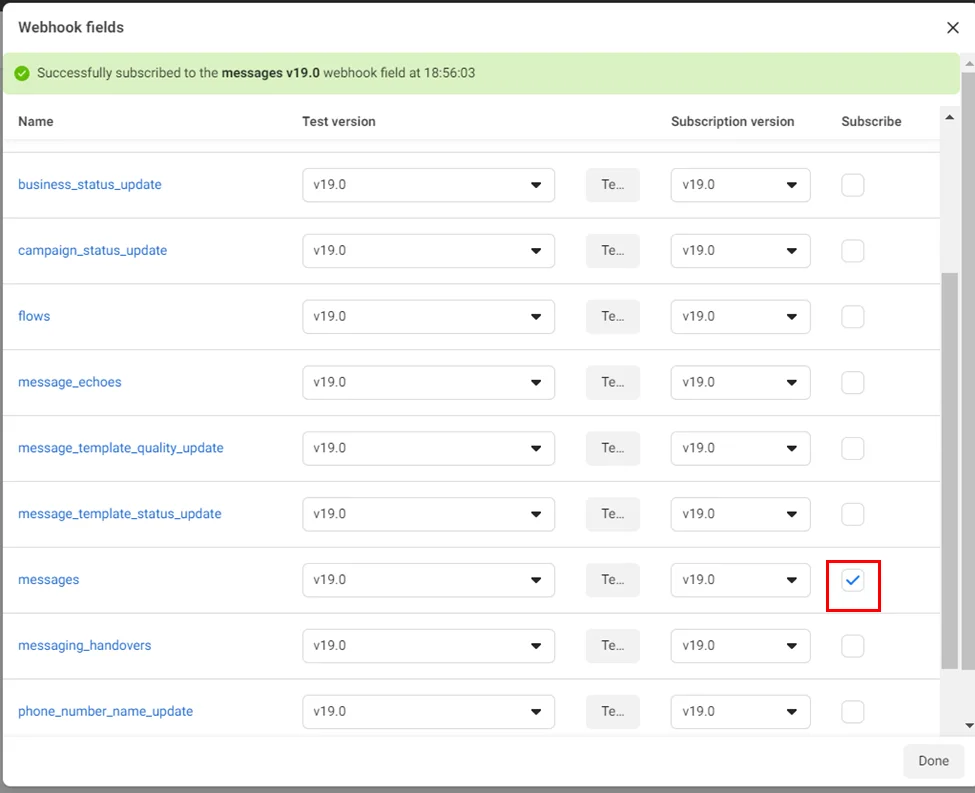
- Subscribe for messages

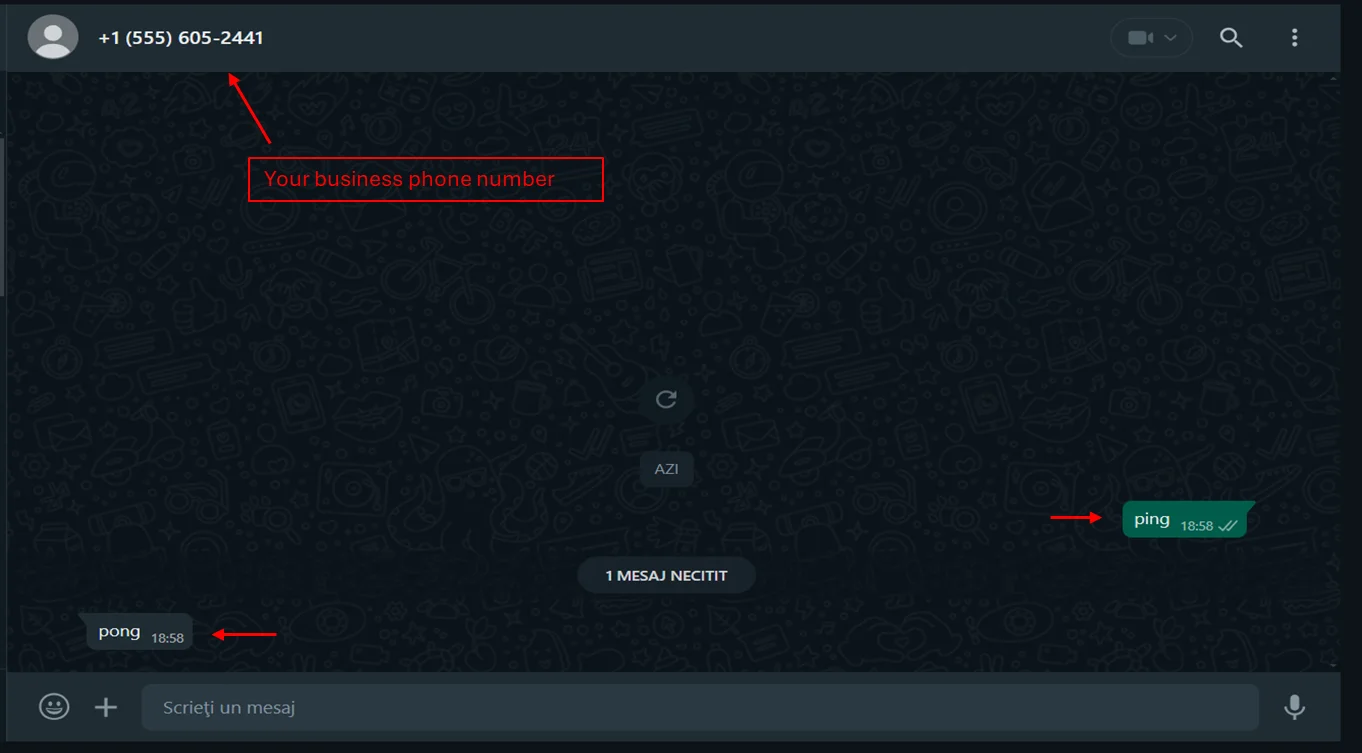
- Now you have a bot. For testing, you can send “ping” from the test number
This is it!
You can find the complete project on my Github
I hope that you found this tutorial informative and helpful, and I encourage you to check out our other articles for more tips and tricks on mastering your craft.
Let me know if you need help by contacting me on Discord or write me an email at cristi@genezio.com.
Article contents
Subscribe to our newsletter
Genezio is a serverless platform for building full-stack web and mobile applications in a scalable and cost-efficient way.
Related articles


More from Tutorials
Mastering Automation: A Step-by-Step Guide to Creating a WhatsApp ChatBot with ChatGPT-4o
Cristi Miloiu
Jun 03, 2024
Implement a newsletter on static websites with Mailchimp or HubSpot
Tudor Anghelescu
Mar 21, 2024