Mastering Automation: A Step-by-Step Guide to Creating a WhatsApp ChatBot with ChatGPT-4o
30 minutes read

Cristi Miloiu
Jun 03, 2024
Share on:
Welcome, automation enthusiasts! My name is Cristi, and in this tutorial, I’ll guide you through the process of creating an automated WhatsApp ChatBot and implementing a simple interaction with ChatGPT-4o. We’re also going to use Genezio as the tool to manage and quickly deploy a customized API that can communicate with the WhatsApp API Cloud and OpenAI API without the need for the user to manage servers on their own. Before we dive into the tutorial, let’s discuss the type of WhatsApp bots and the potential ways you can use a bot for personal or business related tasks.
What is a WhatsApp bot?
A WhatsApp bot is an automated program that interacts with users on the WhatsApp messaging platform. Depending on how you set it up, the bot will be able to perform actions, offer services and provide information to your users.
There are two main ways to set up a bot. It can be rule-based, a decision-tree-type interaction, where the bot might ask the user to complete an action or choose an answer to continue. For example, this might be an appointment setting bot, someone opens WhatsApp and the bot asks them for their name, number and all the information needed to schedule an appointment. Or maybe it’s a troubleshooting bot that asks you a series of yes/no questions to discover the issue.
Alternatively, you could set a bot as NLP-based (natural language processing), for a more intelligent bot that can answer in real time and recall previous conversations and customer information. If the bot is trained on business information, a user can quiz the WhatsApp bot with more detailed questions and receive better tailored answers. ChatGPT is also human-presenting, capable of human-like conversations, which is great for handling user interactions (customer service inquiries, complaints, troubleshooting, etc.)
In this tutorial, we’re going to be using ChatGPT to power this bot, so it will have NLP capabilities. Once we’ve set this bot up, you’ll be able to open WhatsApp on your phone and have a conversation with your bot.
Who can build WhatsApp bots?
Anyone who has a WhatsApp business account can create a WhatsApp bot. You need the business account so that you can get access to the API integration and start using features like automated messaging, webhooks, and high-volume message handling. If you don’t have a business account, best to get that set up before you proceed.
Even though you are setting up a business account it doesn’t mean you have to use it for business. Many people like to create bots for personal use. Here are some examples:
Event planning: Automatically send invitations, track RSVPs, and provide guests with event details and updates using natural conversational prompts.
Daily reminders: Set up and manage reminders for personal tasks, such as appointments, medication schedules, or workout routines with a more interactive experience.
Information retrieval: Ask the bot questions and receive accurate and context-aware responses on topics like weather updates, news, or traffic conditions.
The common use cases for businesses (big and small) seem to be:
Customer support: Offer 24/7 support to answer FAQs, troubleshoot issues, and provide product information with more personalised and empathetic responses.
Sales and marketing: Run marketing campaigns, send promotional messages, and nurture leads through automated, engaging follow-ups that feel personal.
Order processing: Handle orders and reservations, send order confirmations, and update customers on delivery status with clear and helpful communication.
Feedback collection: Automatically collect and analyse customer feedback to improve products and services, with the ability to understand nuanced feedback through ChatGPT’s advanced language capabilities.
Alright, now let’s dive into how you can actually create your own WhatsApp bot!
Overview:
In this tutorial, we’ll discuss the following:
- Create an API to manage requests
- Create a ChatGPT Worker that responds in time to the user.
- Get the API Key from OpenAI
- Create the app on the WhatsApp API Cloud
- Configure the project
Create an API that manages all requests
The first time, open your favourite IDE and a terminal.
- In your terminal install Genezio using npm:
npm install genezio -g
- Then, use this command to log in:
genezio login
3.Now create the project by running this command:
git clone https://github.com/cristim67/whatsapp-assistant-starter
This command will initialise your project.
- Change into the newly created
whatsapp-assistant-starterfolder:
cd whatsapp-assistant-starter
- Create a .env file and paste the credentials. The file should be like this:
GRAPH_API_TOKEN=<temporary access token>
BUSINESS_PHONE_NUMBER_ID=<phone number ID>
WEBHOOK_VERIFY_TOKEN=<random string>
OPENAI_API_KEY=<token from OPENAI>
GRAPH_API_TOKEN: Token for accessing the Facebook Graph API.
WEBHOOK_VERIFY_TOKEN: Token for verifying webhook requests.
BUSINESS_PHONE_NUMBER_ID: ID of the business phone number for sending WhatsApp messages.
OPENAI_API_KEY: Token for accessing the OpenAI API.
I will show you later where you can get it.
- In your terminal run:
npm install
- Open the whatsapp.ts file and implement the webhook method.
@GenezioMethod({type: "http"})
async webhook(request: GenezioHttpRequest): Promise<GenezioHttpResponse> {
 try {
   if (request.queryStringParameters !== undefined) {
     // Webhook verification by WhatsApp Business API
     const mode = request.queryStringParameters["hub.mode"];
     const token = request.queryStringParameters["hub.verify_token"];
     const challenge = request.queryStringParameters["hub.challenge"];
     if (mode === "subscribe" && token === this.WEBHOOK_VERIFY_TOKEN) {
       console.log("Webhook verified successfully!");
       return {
         headers: {"Content-Type": "application/json"},
         statusCode: "200",
         body: challenge
       }
     } else return {
       headers: {"Content-Type": "application/json"},
       statusCode: "403",
       body: "Forbidden"
     }
   }


   const body = request.body.entry[0].changes[0].value.messages[0].text.body; // Message received


   const response = await this.GPT_WORKER.generateResponse(body);
   if (!response) {
     return {
       headers: {"Content-Type": "application/json"},
       statusCode: "200",
       body: "Message not handled"
     }
   }


   await this.#sendMessage(response, request.body.entry[0].changes[0].value.messages[0].from)


   return {
     headers: {"Content-Type": "application/json"},
     statusCode: "200",
     body: "Message sent"
   }


 } catch (error) {
   console.error(error)
   return {
     headers: {"Content-Type": "application/json"},
     statusCode: "500",
     body: "Internal server error"
   }
 }
}
This structure defines the following components:
@GenezioMethod({type: "http"}): This decorator is used to transform a class method into an endpoint that can receive HTTP requests.
#sendMessage: This method sends messages using the Facebook Graph API. It uses axios to make HTTP POST requests.
webhook: This method serves as the endpoint for receiving all application requests.
Why do we use Genezio?
Genezio plays a crucial role in this tutorial by managing and quickly deploying a customized API that communicates with the WhatsApp API Cloud and OpenAI API. Genezio’s platform simplifies the process of creating and maintaining scalable backends, ensuring that developers can focus on building the core features of their applications without worrying about server management. Its type-safe interface makes it particularly effective at connecting APIs reliably.
By using Genezio, you benefit from a streamlined, efficient setup, enabling robust and seamless interactions between your WhatsApp bot and various services. This tool is not only excellent for this specific use case but also versatile for event planning, daily reminders, and more, making it an essential addition to your development toolkit. To learn more about Genezio and how you can use it for your next project, check out our starter guide .
How the WhatsApp API Works
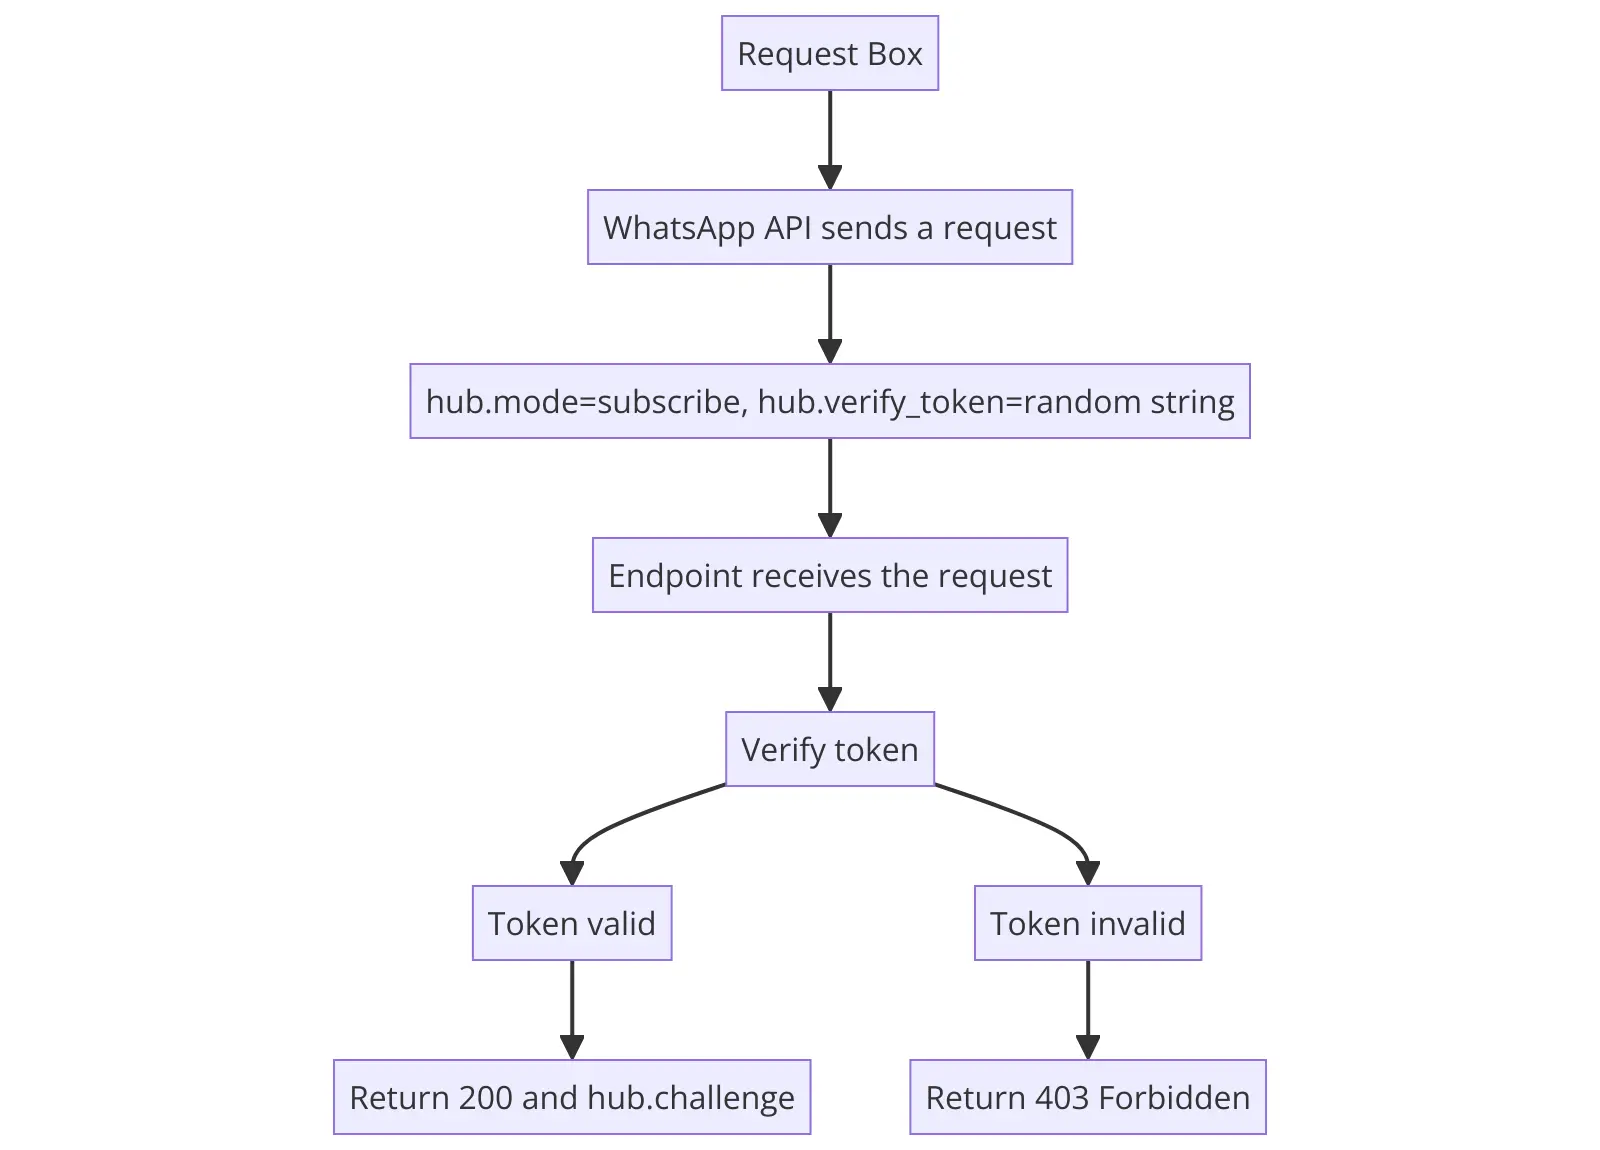
The verification of the WhatsApp API Cloud operates as follows: The WhatsApp API sends a request to the configured endpoint with hub.mode = "subscribe" and hub.verify_token = a random string set by you. The hub.verify_token must be the same as the WEBHOOK_VERIFY_TOKEN variable that you set in the .env file. This token is used for security to ensure that you are the intended recipient of the response. If this data is received, you must return a status code of 200 along with hub.challenge. Otherwise, you should return a 403 Forbidden status code.
In this context, hub.mode, hub.verify_token, and hub.challenge are parameters used in the HTTP request and response process:
hub.modeindicates the type of operation being requested, in this case, subscribing to updates.hub.verify_tokenis a user-defined string that serves as a security measure to verify the authenticity of the request.hub.challengeis a string sent by the WhatsApp API that needs to be returned by the endpoint to confirm successful verification.
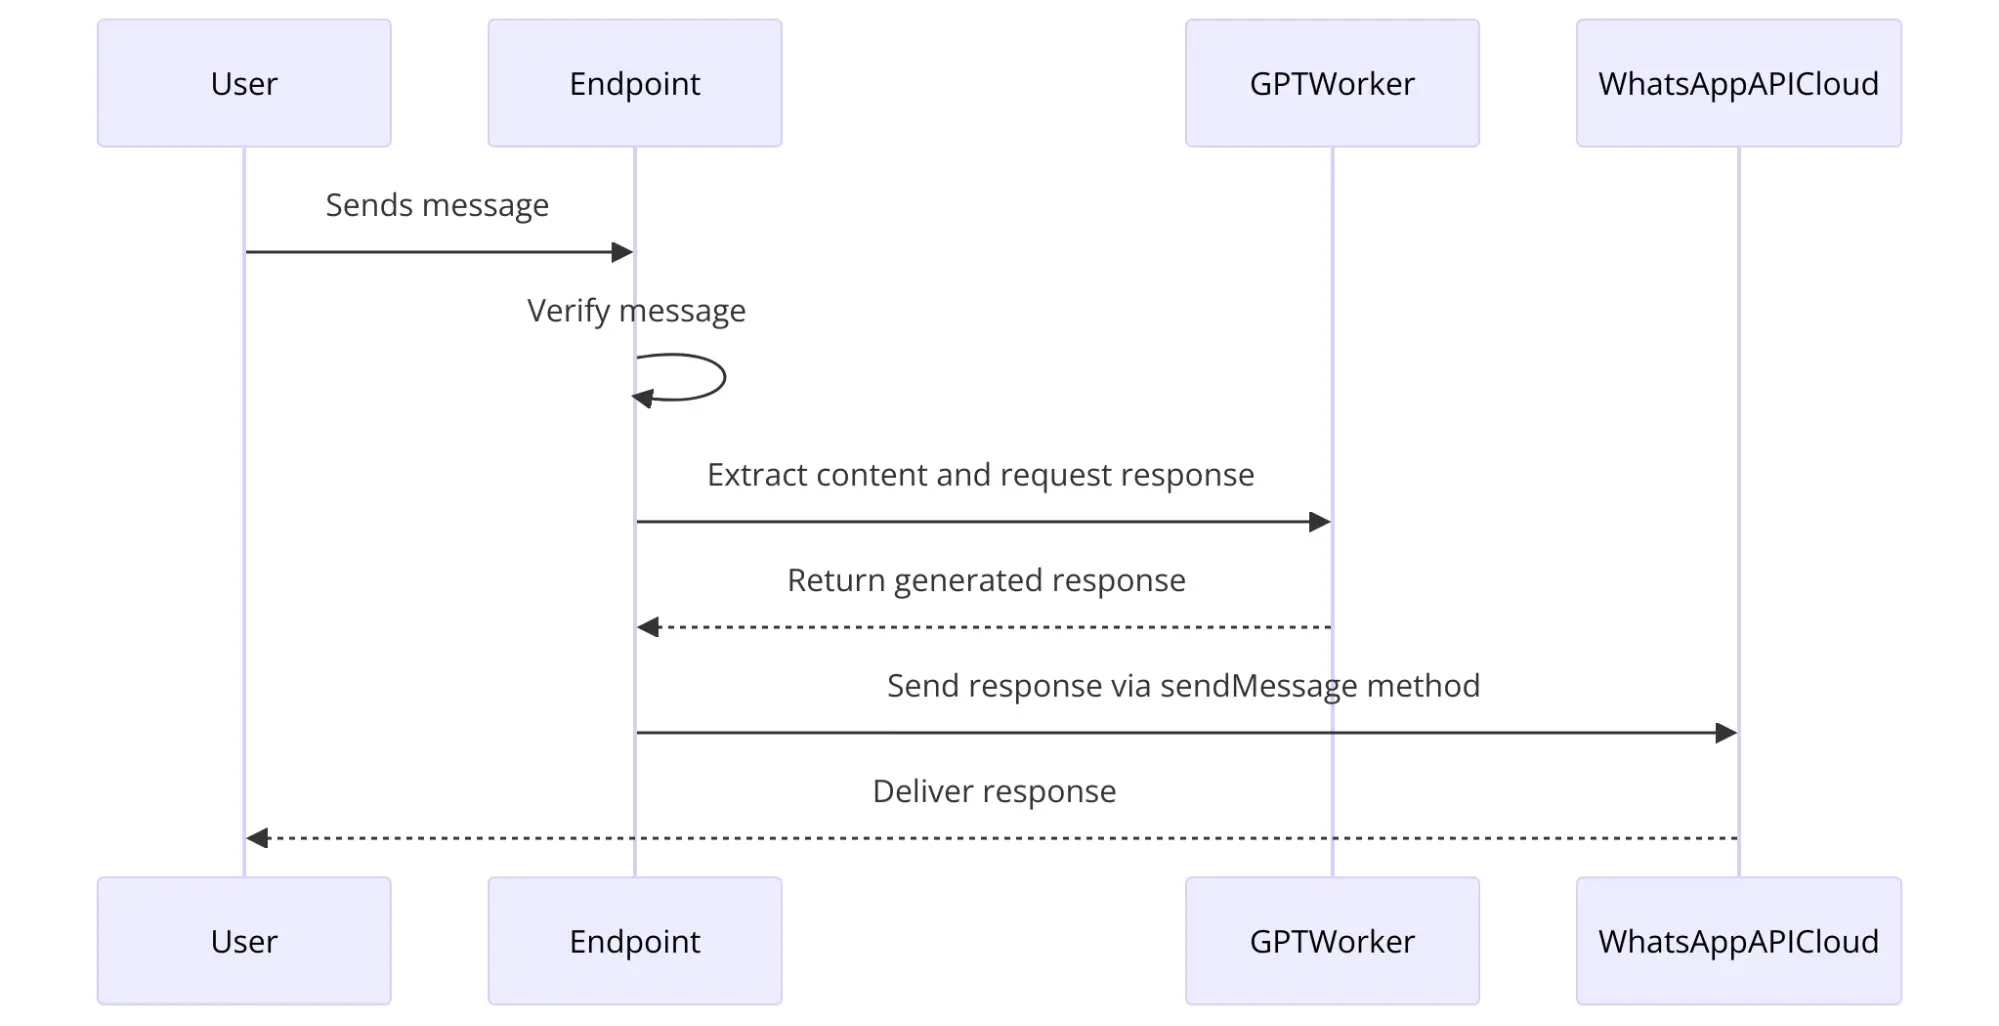
After verification, the endpoint processes incoming messages. It extracts the message content and utilizes the GPT worker to generate a response. The generated response is then sent back to the user via the #sendMessage method using the WhatsApp API Cloud.
Create a ChatGPT Worker that responds in time to the user.
- In your terminal run:
npm install openai
- Open the file called
gptWorker.tsin thewhatsapp-bot-starterdirectory.
import { OpenAI } from "openai";
import { GenezioDeploy } from "@genezio/types";

@GenezioDeploy()
export class GptWorker {
  OPENAI_API_KEY: string;

  constructor() {}

  async generateResponse(prompt: string): Promise<string | null> {}
}
This structure defines the following components:
- @GenezioDeploy() decorator is used to know which class is deployed on the server provided by Genezio for the production environment. This way, your code can be accessed at any time without having a local server running.
export class GptWorkeris the definition of the class that we will use in this tutorial. OPENAI_API_KEY`is the credential you need.generateResponseis the method by which we will be able to chat with ChatGPT-4o and return the response.
- Implement the constructor.
constructor() {
 if (!process.env.OPENAI_API_KEY) {
   throw new Error("Missing environment variables")
 }


 this.OPENAI_API_KEY = process.env.OPENAI_API_KEY;
}
This constructor ensures that the OPENAI_API_KEY environment variable is set before allowing execution to continue. If not set, it throws an error, stopping execution and indicating that required environment variables are missing
- Implement the
generateResponsemethod
async generateResponse(prompt: string): Promise<string | null> {
 const openai = new OpenAI({
   apiKey: this.OPENAI_API_KEY
 });


 const response = await openai.chat.completions.create(
   {
     model: "gpt-4o",
     messages: [
       {
         role: "system",
         content: "You are an assistant."
       },
       {
         role: "user",
         content: prompt
       }
     ]
   }
 )


 return response.choices[0].message.content;
}
The generateResponse method uses the OpenAI API to send a user message and receive a response generated by the GPT-4o model, which it then returns.
- Now you need to take the credentials and use them in the .env file.
Get the API Key from OpenAI
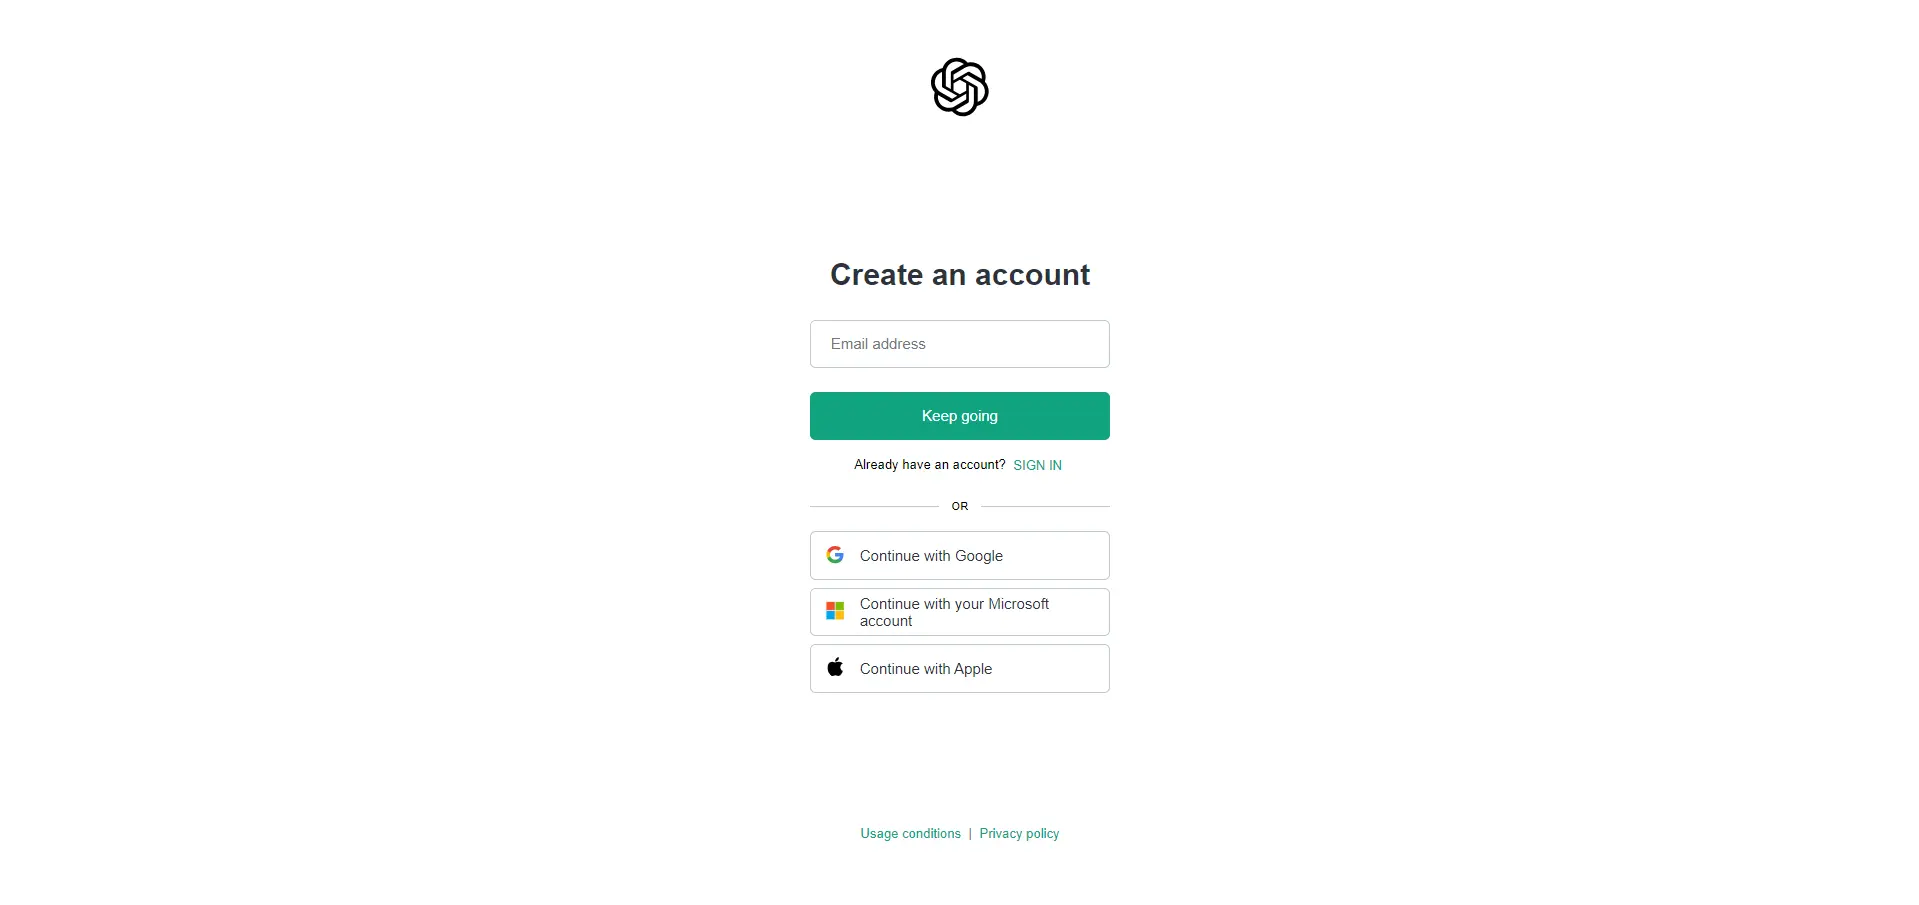
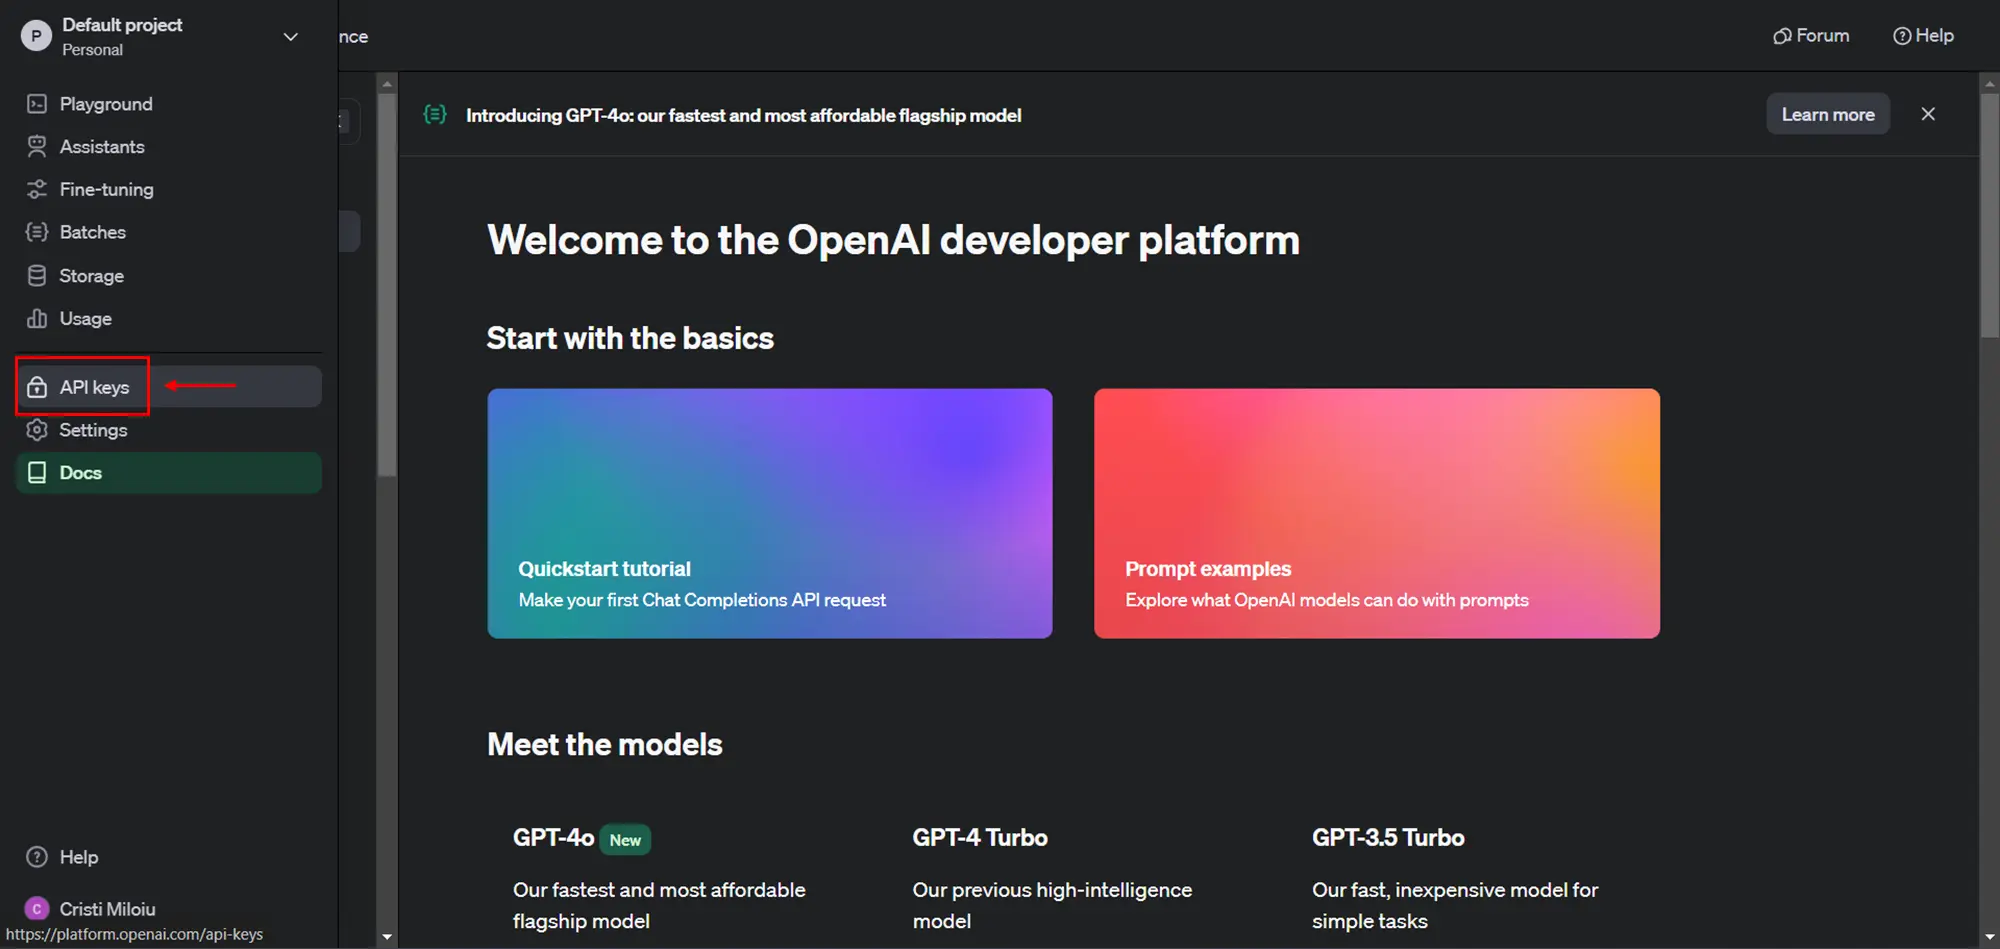
- Go to the Open AI platform and create an account.
- Select “API keys” in sidebar
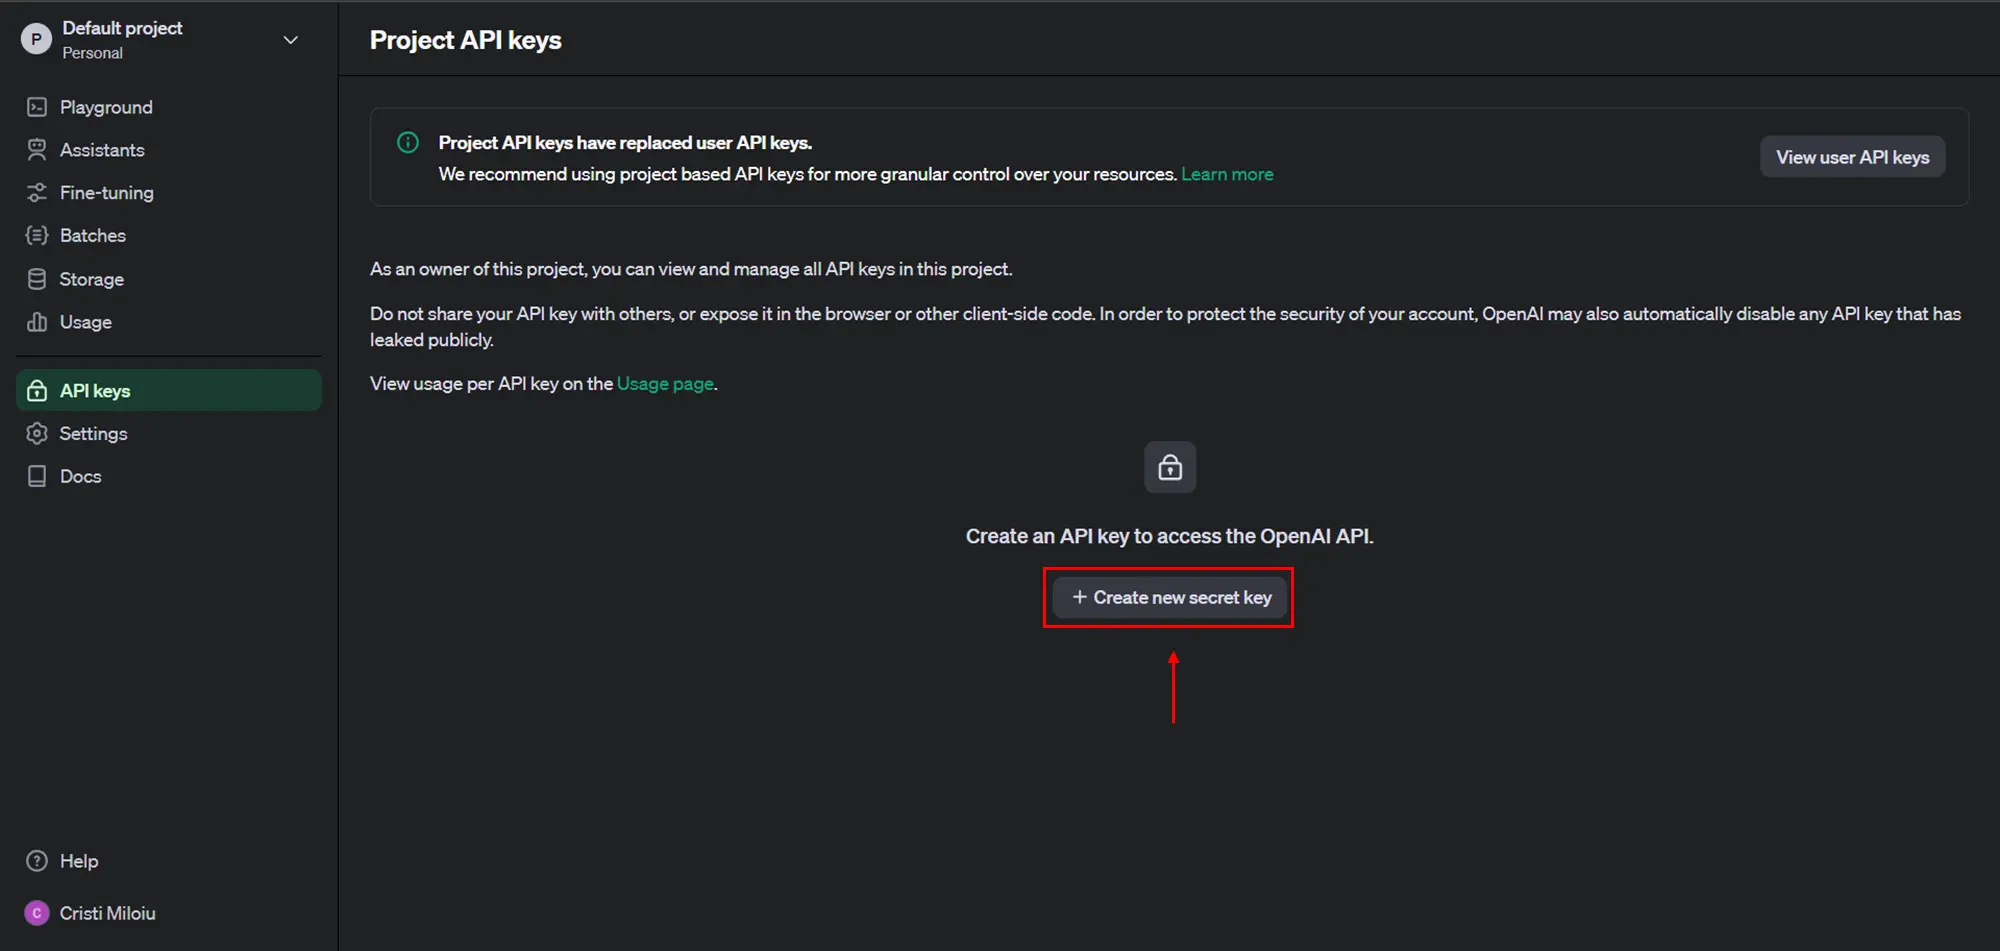
- Select “Create new secret key”
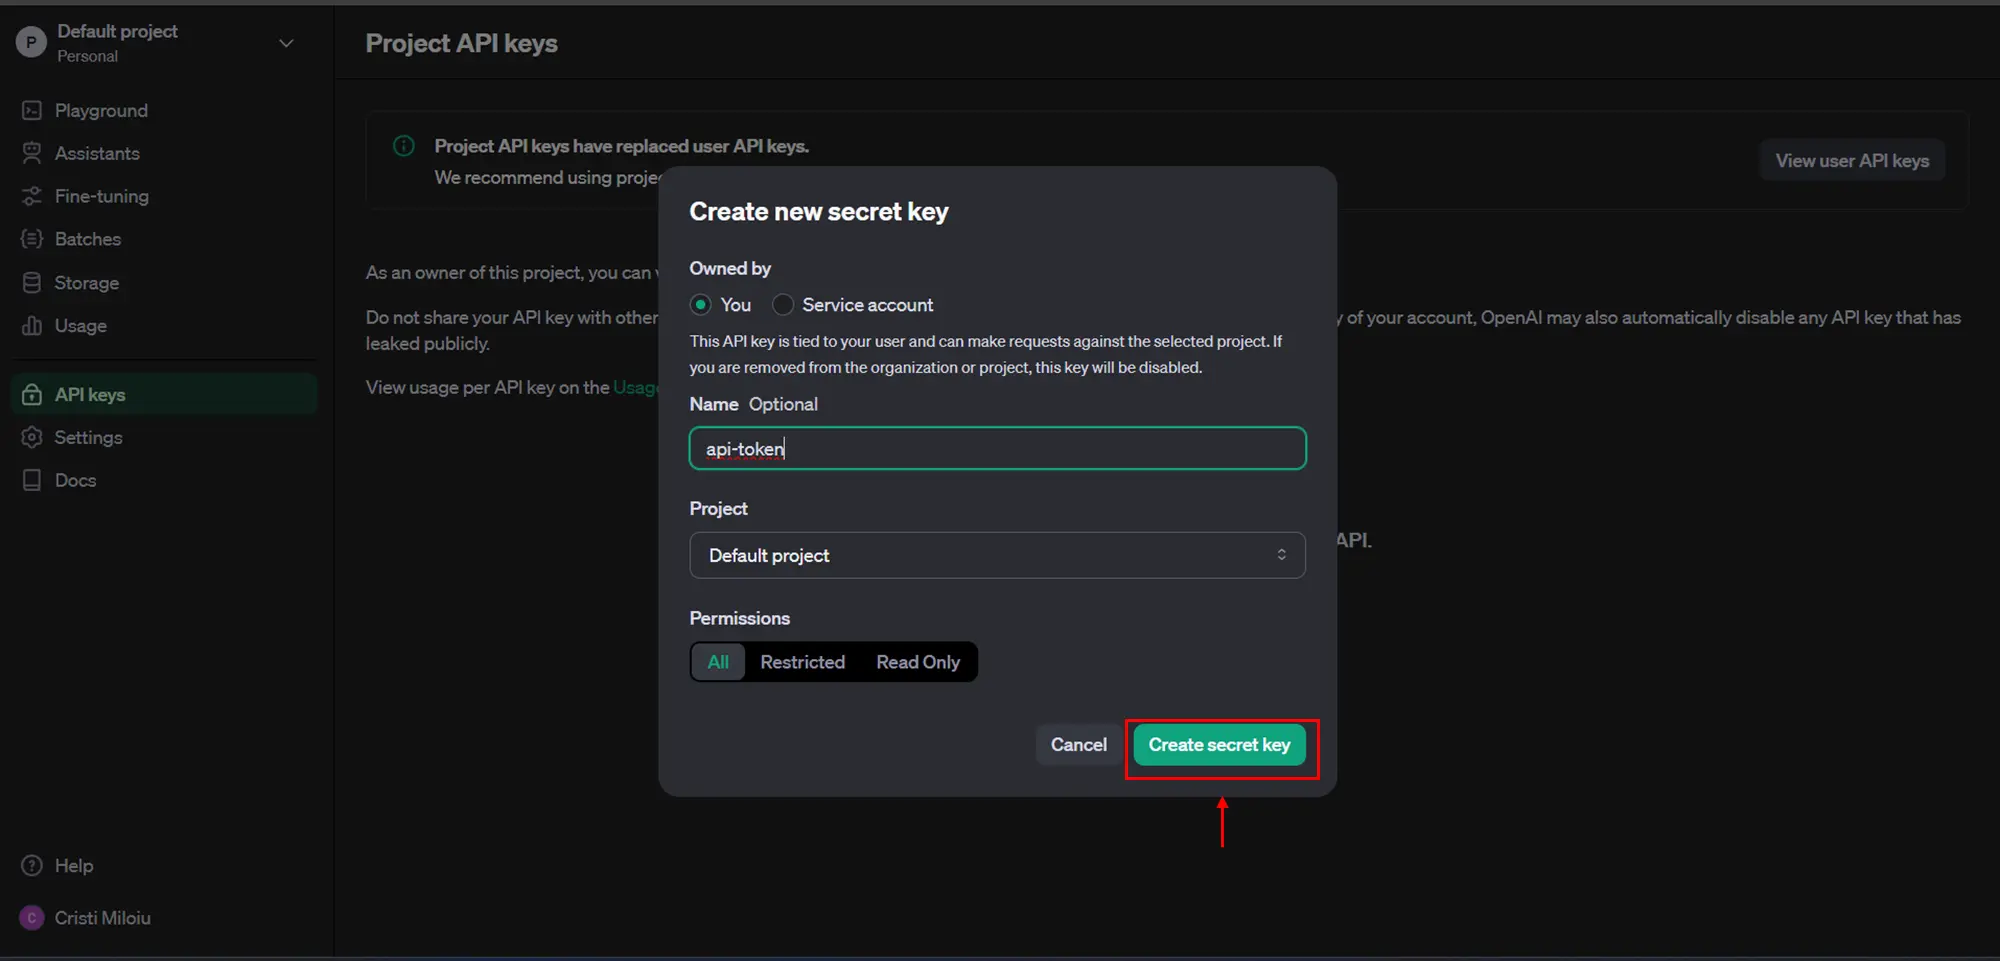
- Select “Create secret key”
- Select “Copy” button and save this somewhere because you can only see it once.
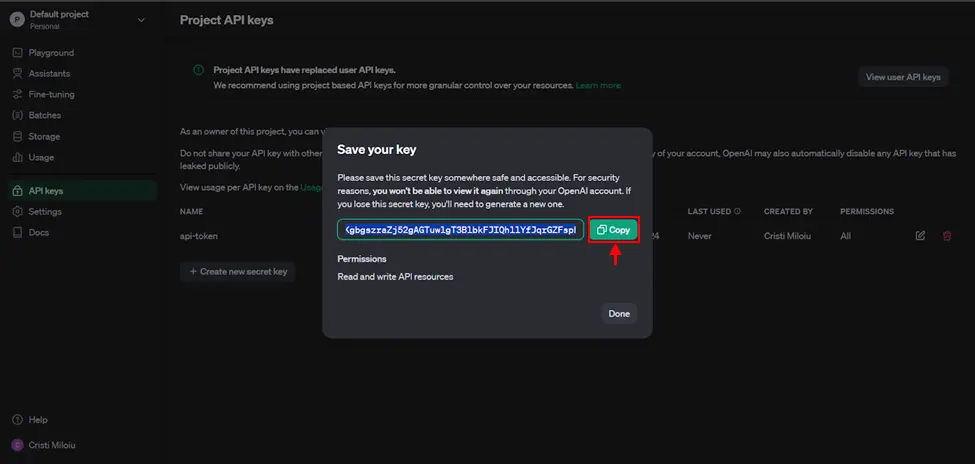
- After you save the key, select “Done” button.
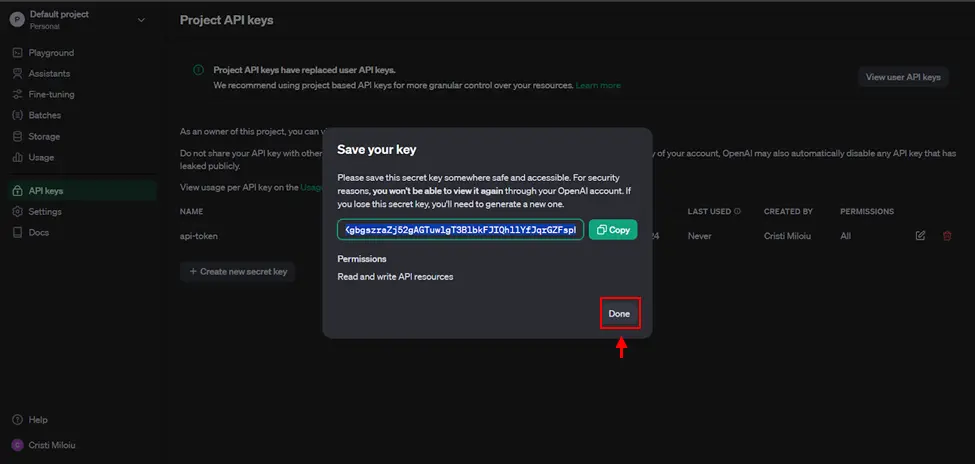
- Put in
.envfile the OPEN_API_KEY
OPENAI_API_KEY=<token generated above>
- Go to the Meta Website and create an account.
- Select “My Apps”
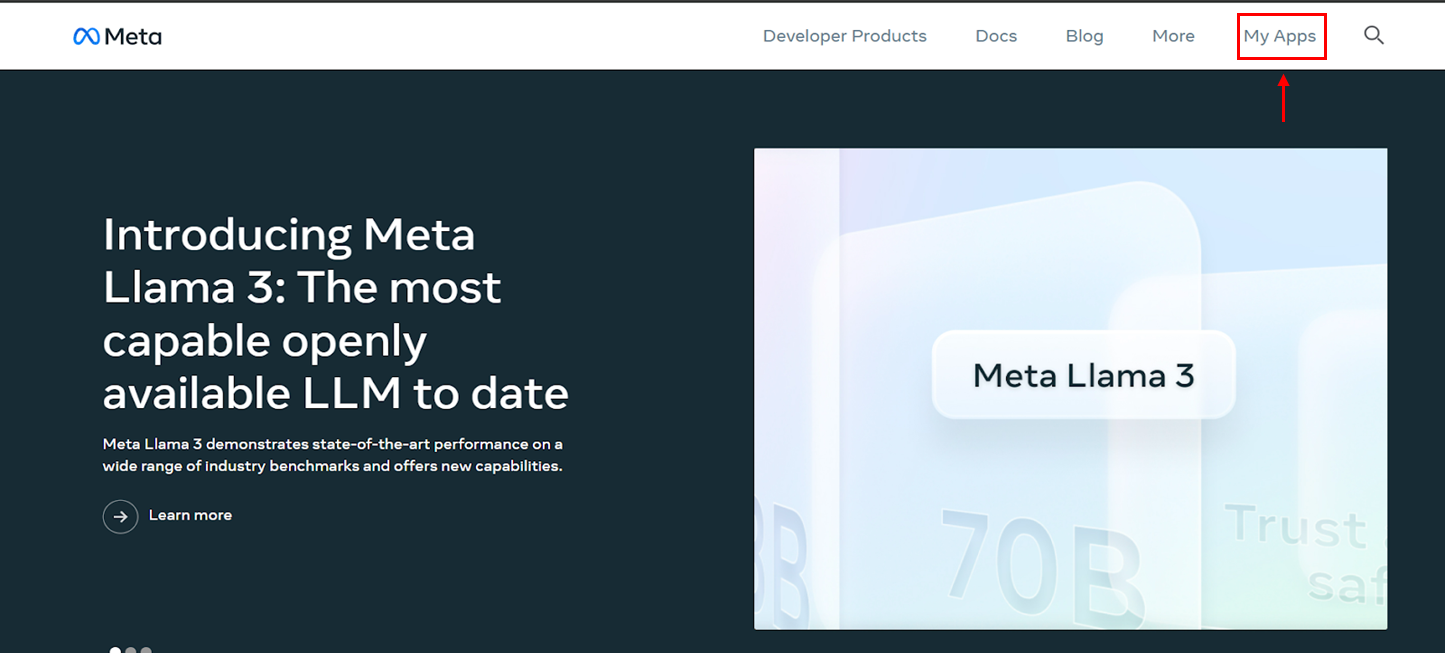
- Select “Create App”

- Select “Other” and click on ‘Next’
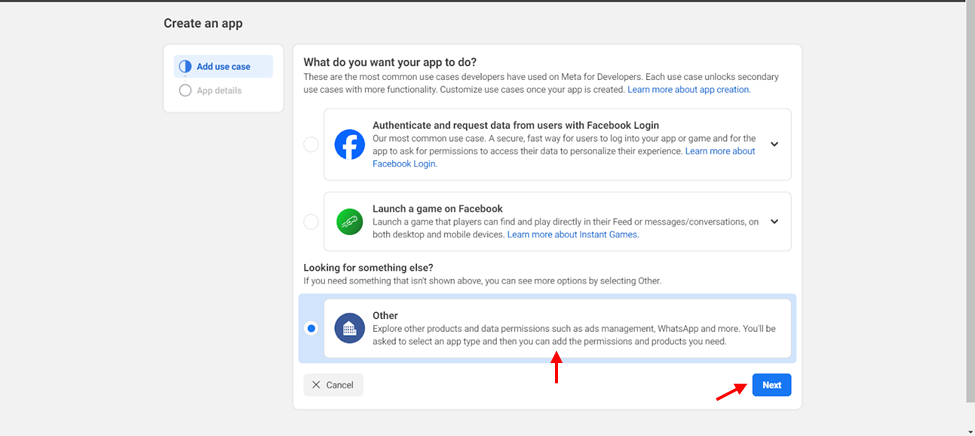
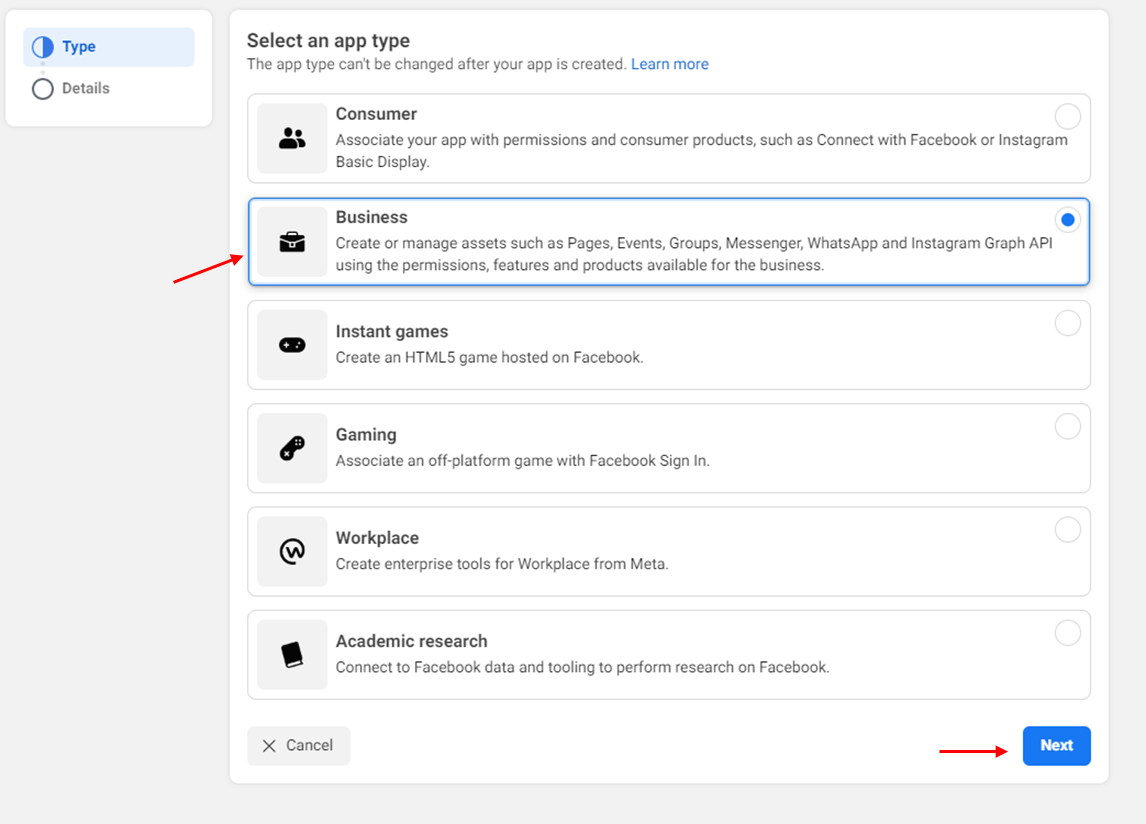
- Select “Business” and click on ‘Next’
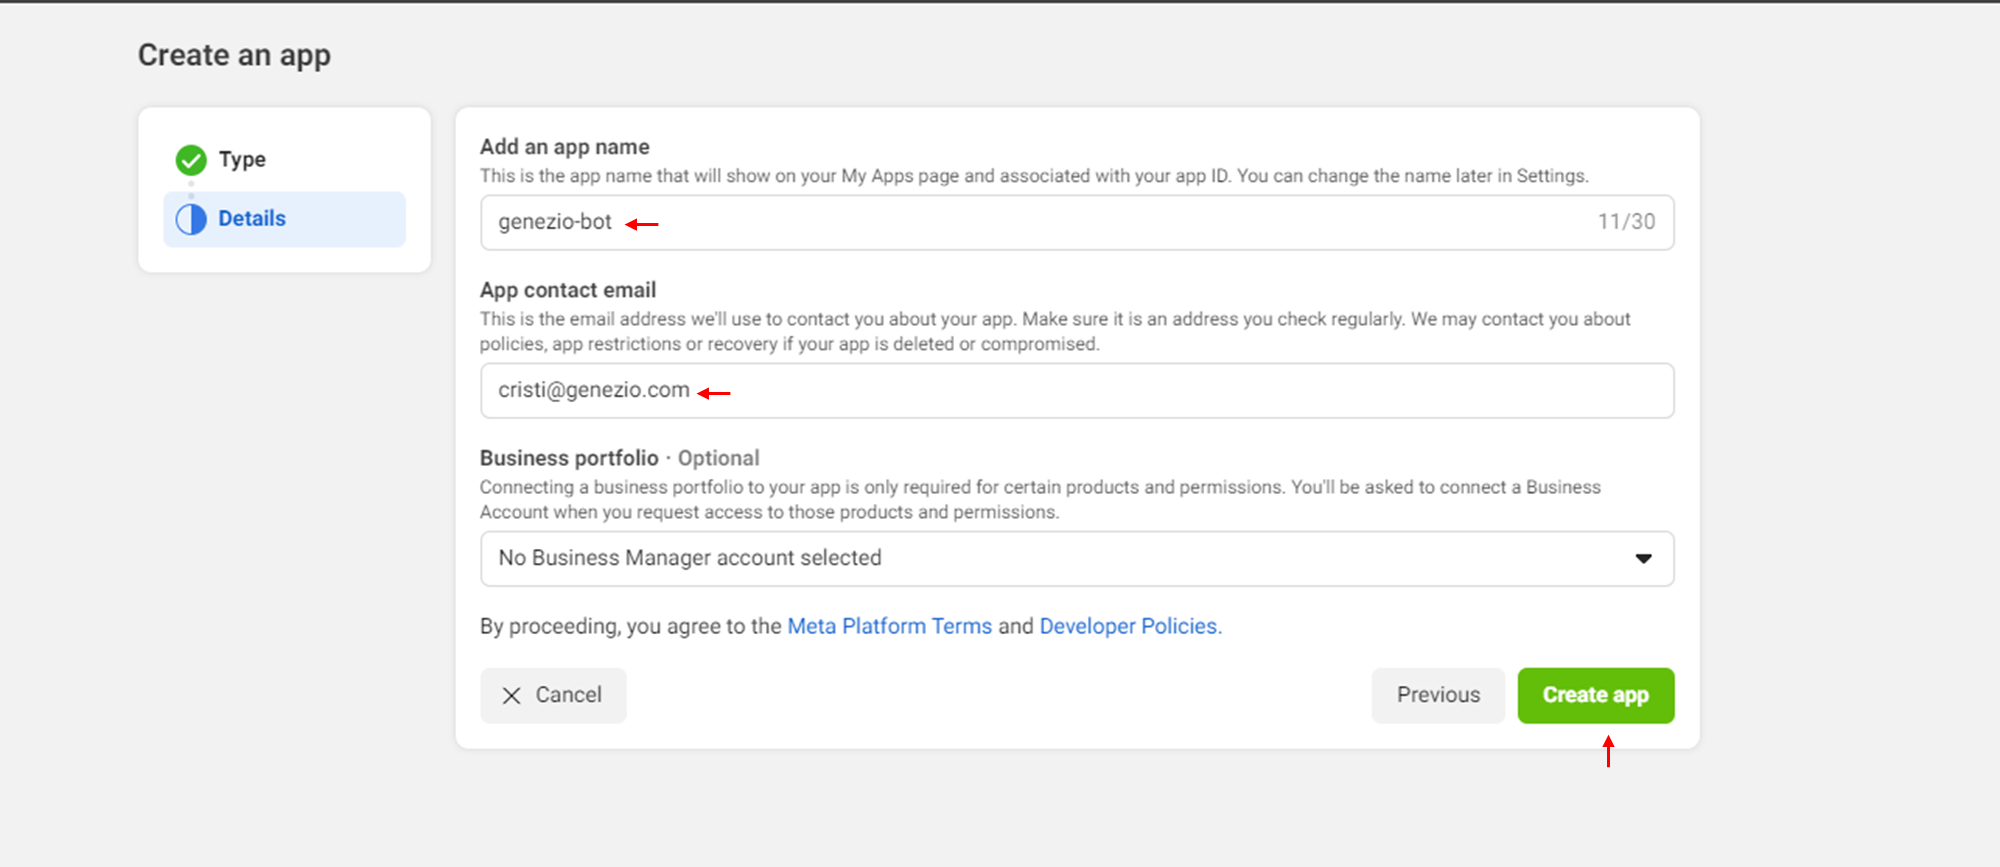
- Add an app name and the contact email address and click on ‘Create app’.
Configure the project
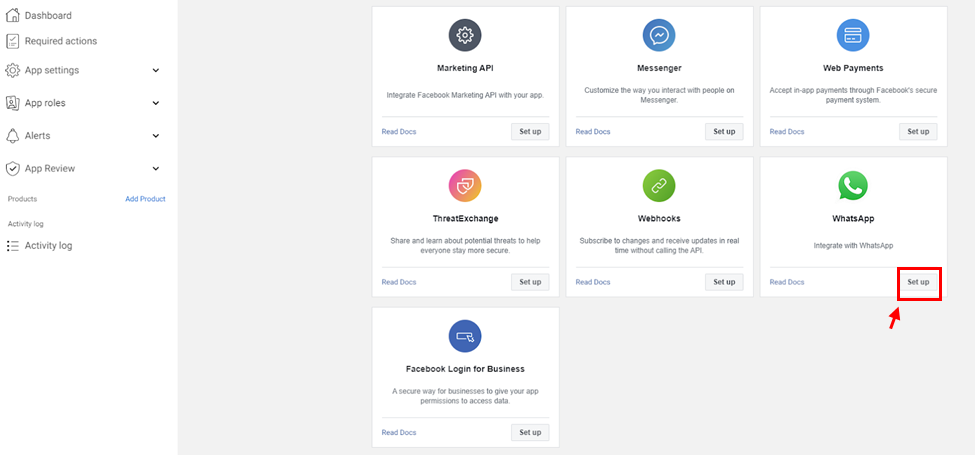
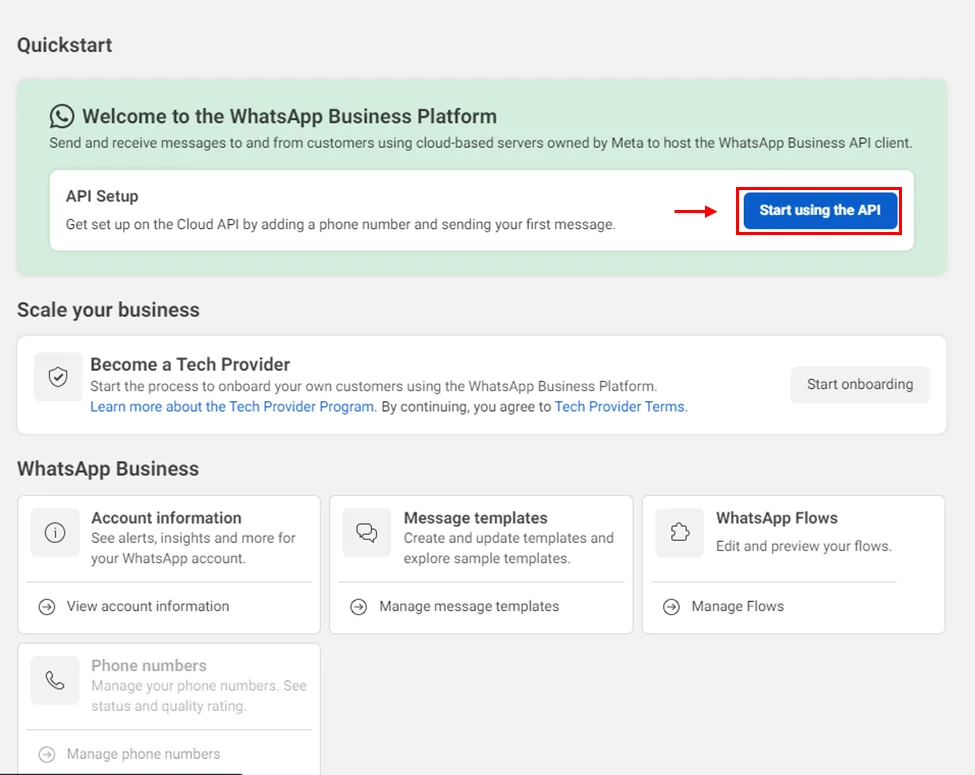
- Search for the Whatsapp Integration and click on ‘Set up’.
- Select a business portfolio
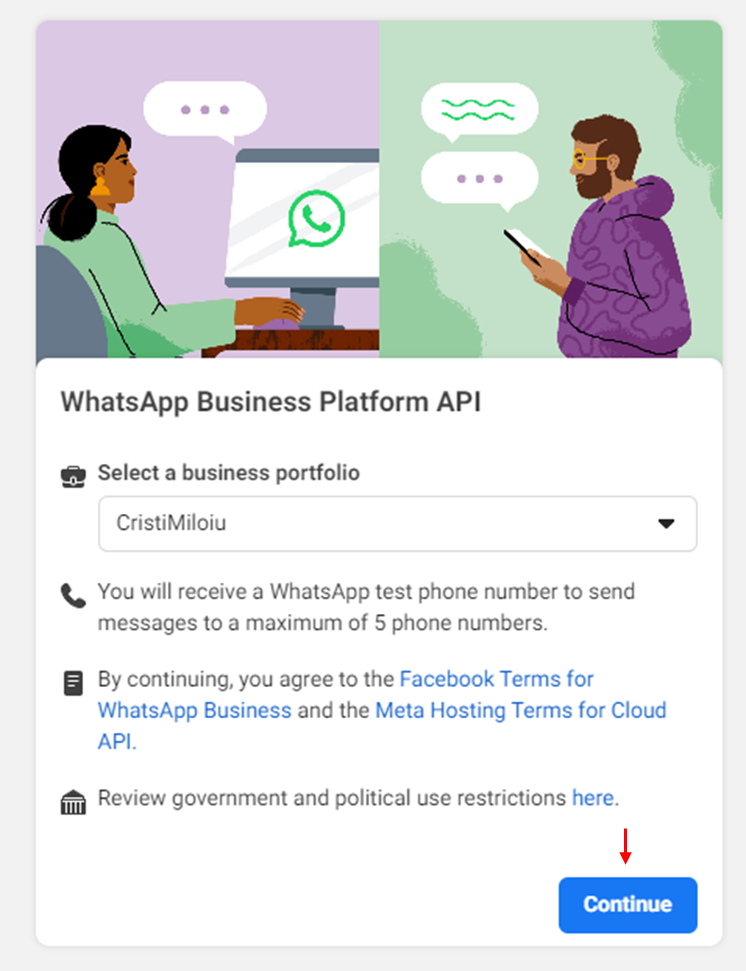
- Start using the API
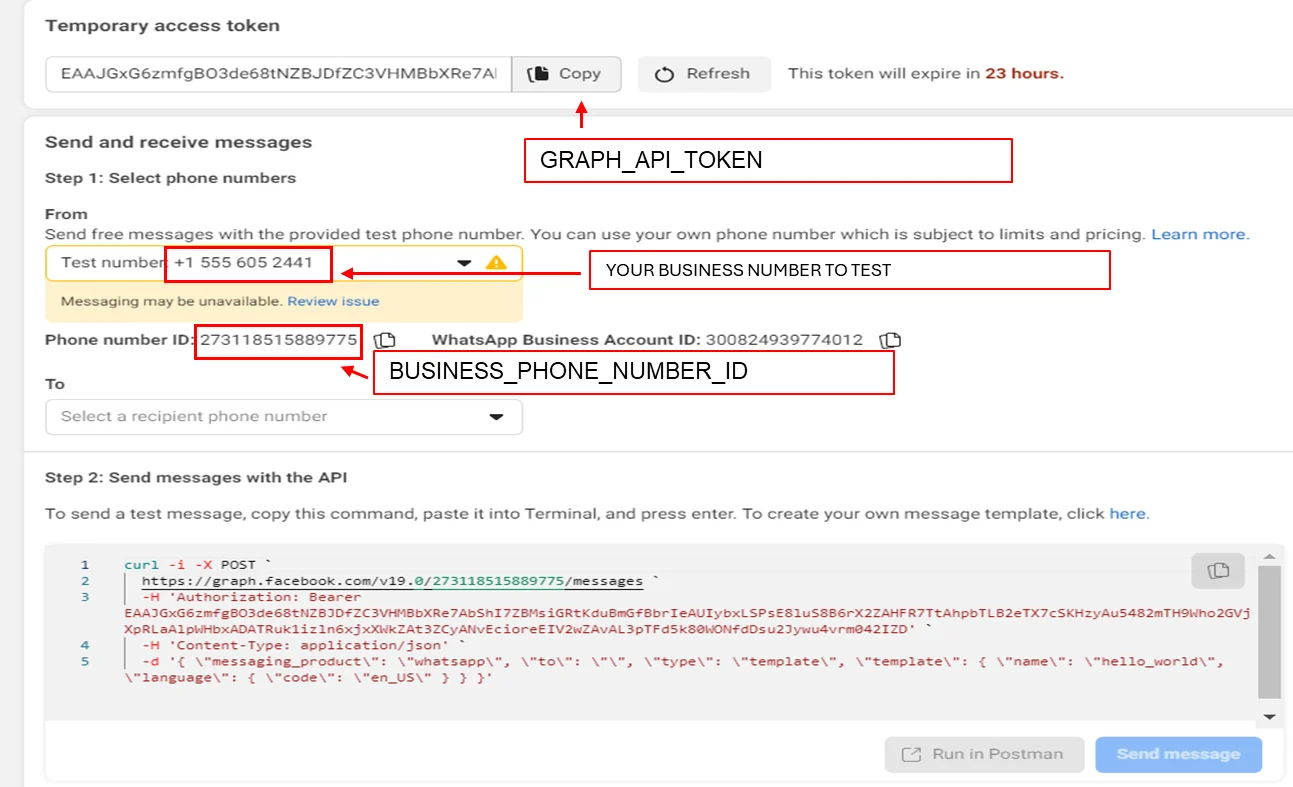
- From here we will take the access token and Phone number ID for the .env file.
GRAPH_API_TOKEN=<temporary access token>
BUSINESS_PHONE_NUMBER_ID=<Phone number ID>
WEBHOOK_VERIFY_TOKEN=<random string>
Note: Here you can also see which phone number you can test the Whatsapp bot on.
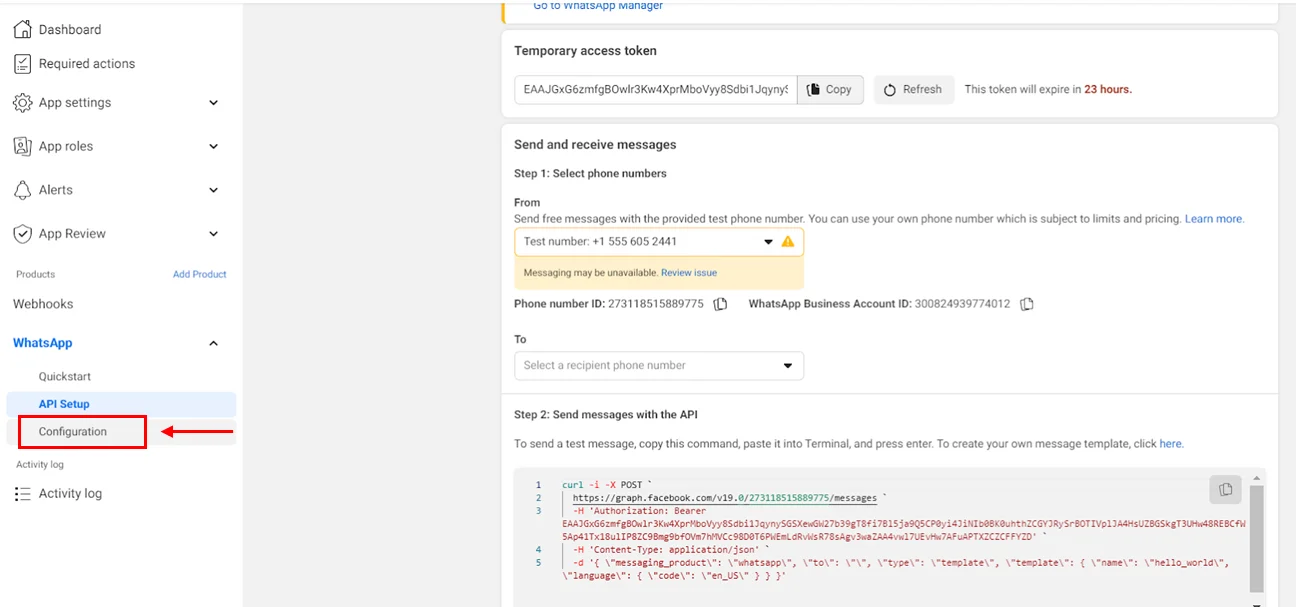
- In order for the bot to work, we still need to configure an api for callback. Select Configuration
- Click on ‘Edit’
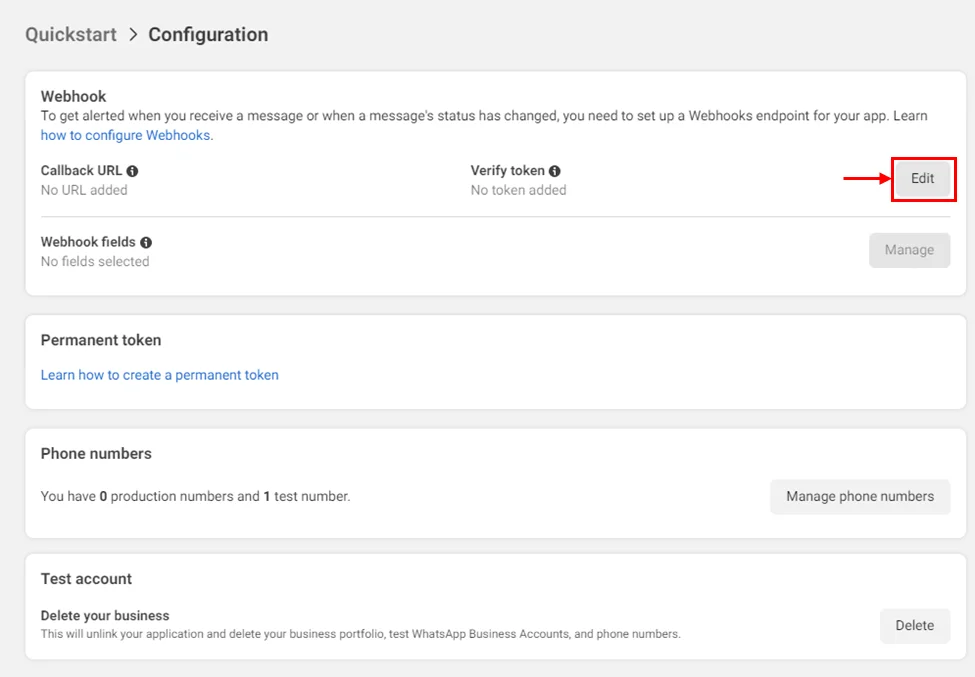
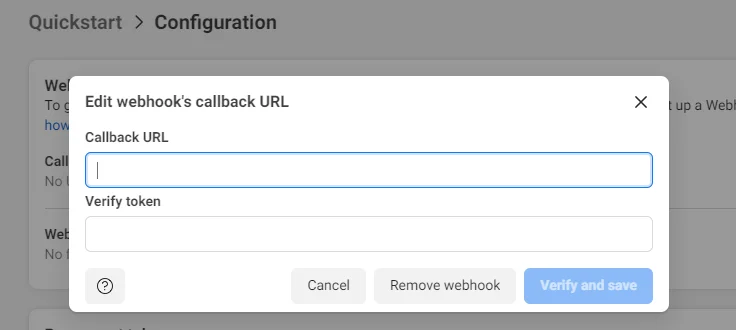
Here we need a callback URL and a verify token. The Callback URL will be generated in the next step and verify token is a random string put by you which is the same as the one in the .env file to the key WEBHOOK_VERIFY_TOKEN
- Deploy your project.
Go back in your project to the root folder of your project and run the following command:
genezio deploy –env .env
Take the url from : BackendService.webhook
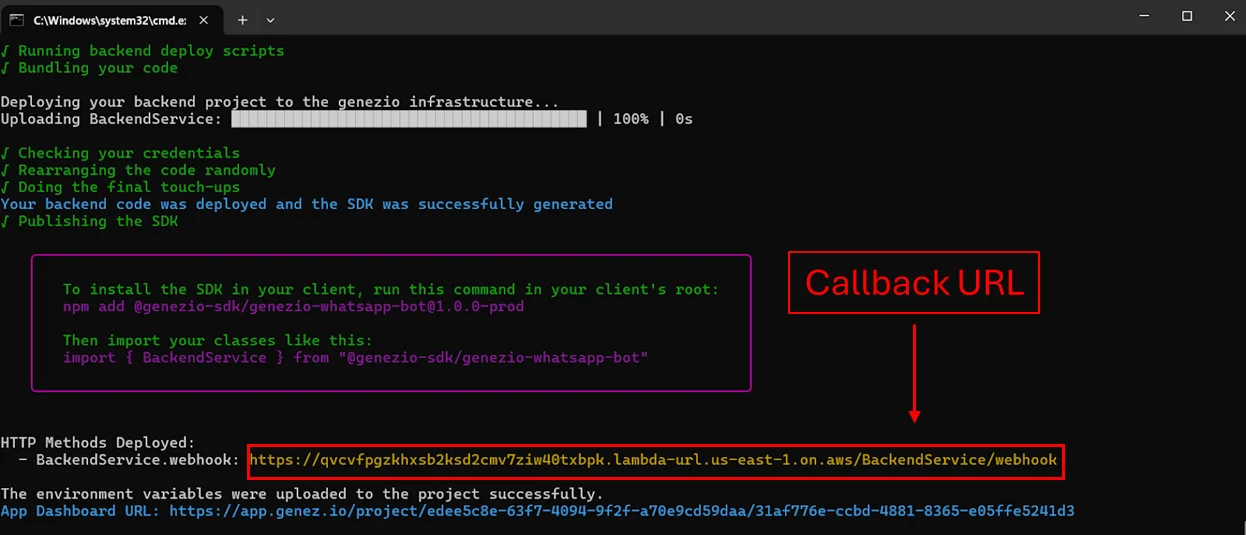
The Callback URL is an endpoint that you provide to the WhatsApp API Cloud, which is used by WhatsApp to send you notifications about events such as new messages, message status updates, and other webhook events. This URL must be accessible over the internet so that WhatsApp can communicate with your server.
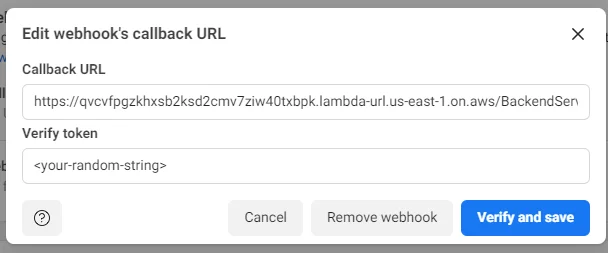
- Put the link to the callback from the platform
- Subscribe for messages
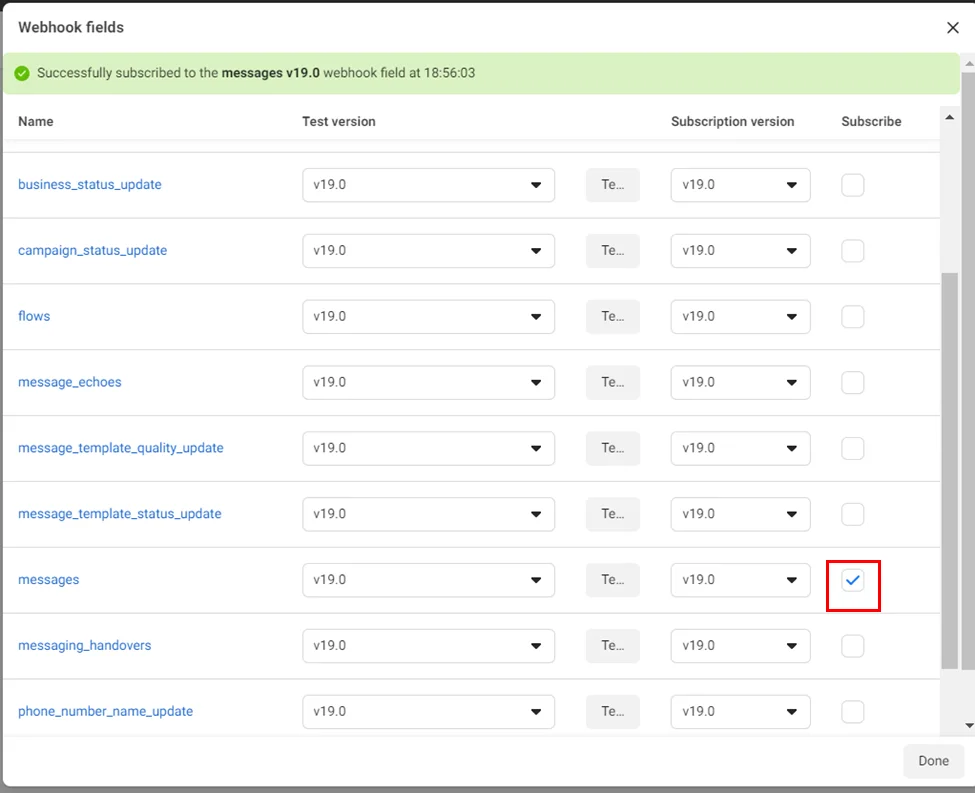
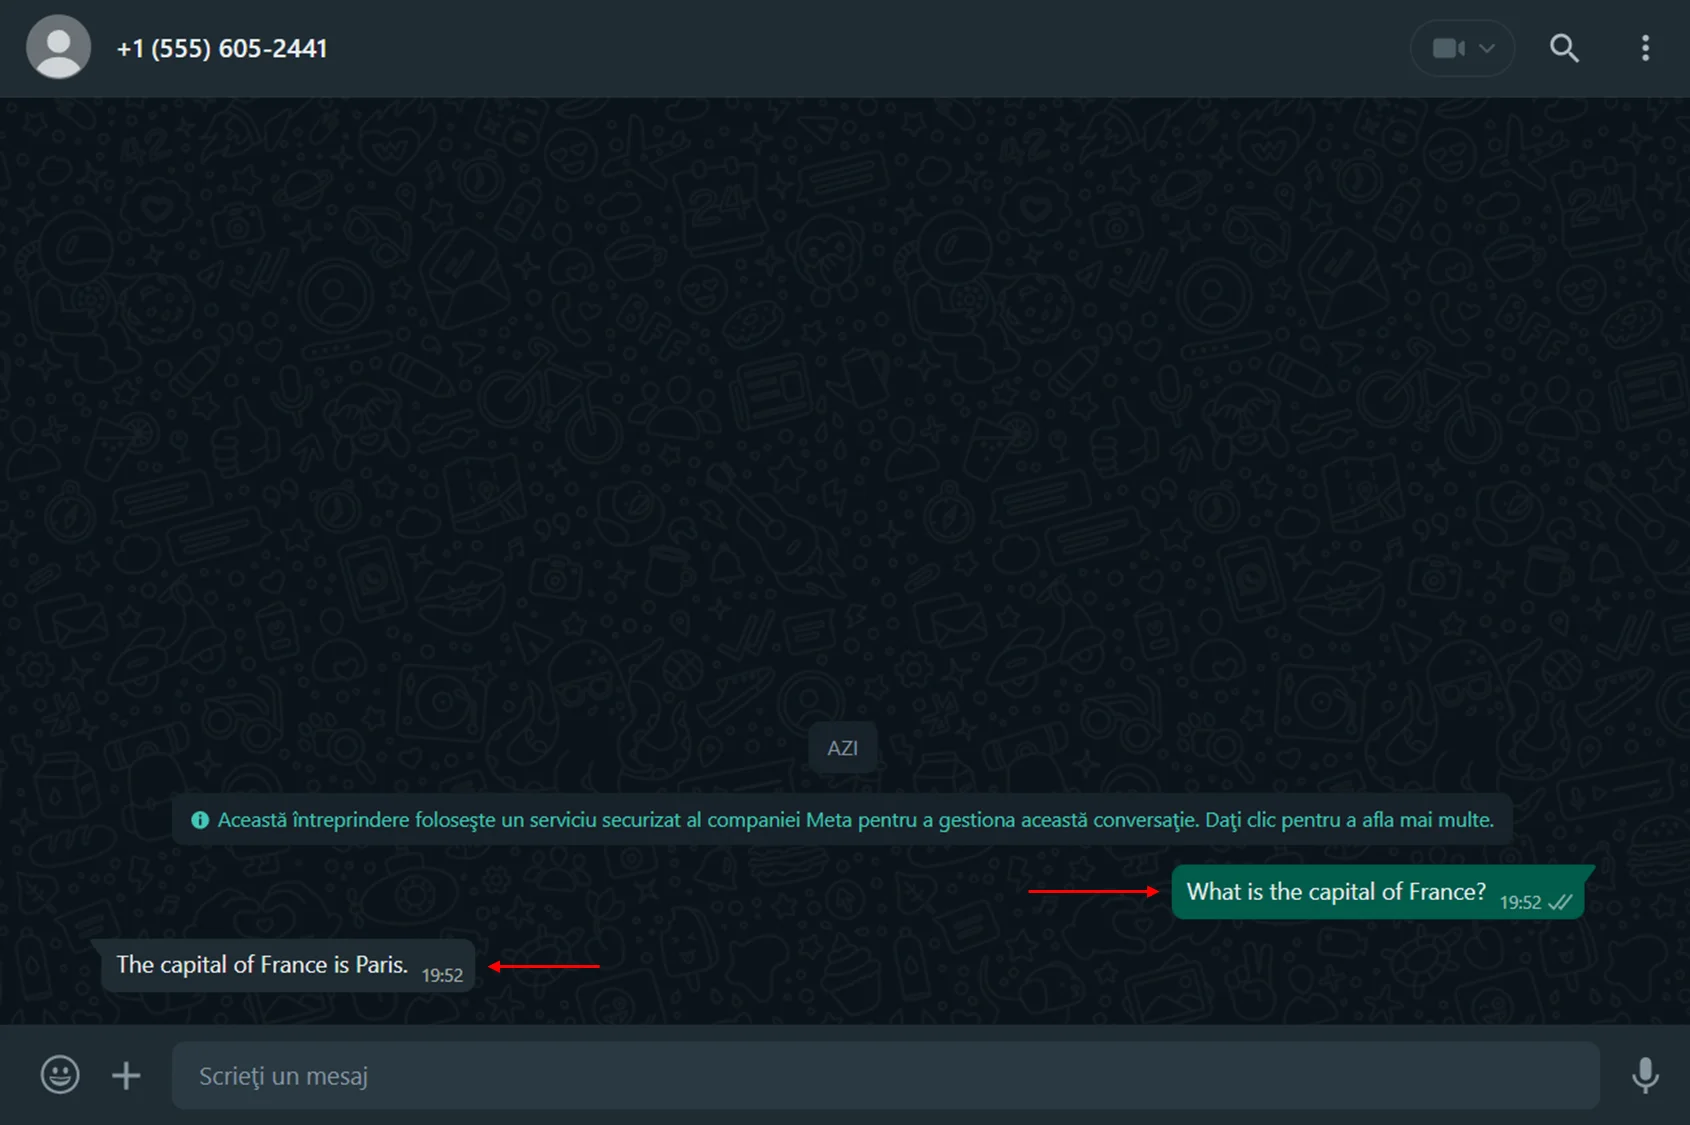
- Now you have a WhatsApp bot. For testing, you can send a question from the test number.
Start using your WhatsApp ChatBot
I hope that you found this WhatsApp ChatBot tutorial helpful, and I encourage you to check out our other articles for more tips and tricks on mastering your craft.
If you would like to train your bot on your own data, we’ve put together this tutorial , which has a detailed explanation of how you can set that up.
If you have any questions about this tutorial or the Genezio platform, feel free to reach out to me on Discord or via my email (cristi@genezio.com). Good luck!
Article contents
Subscribe to our newsletter
Genezio is a serverless platform for building full-stack web and mobile applications in a scalable and cost-efficient way.
Related articles


More from Tutorials
How to Use Genezio with Express for Easy and Error-Free API Management
Bogdan Vlad
Apr 10, 2024